
Including the OWASP CRS
What are we doing?
We are embedding the OWASP CRS in our Apache web server and eliminating false alarms.
Why are we doing this?
The ModSecurity Web Application Firewall, as we set up in Tutorial 6, still has barely any rules. The protection only works when you configure an additional rule set. The CRS provides generic blacklisting. This means that they inspect requests and responses for signs of attacks. The signs are often keywords or typical patterns that may be suggestive of a wide variety of attacks. This also entails false alarms (false positives) being triggered and we have to eliminate these for a successful installation.
Requirements
- An Apache web server, ideally one created using the file structure shown in Tutorial 1 (Compiling an Apache web server).
- Understanding of the minimal configuration from Tutorial 2 (Configuring a minimal Apache server).
- An Apache web server with SSL/TLS support as shown in Tutorial 4 (Configuring an SSL server).
- An Apache web server with extended access log as shown in Tutorial 5 (Extending and analyzing the access log).
- An Apache web server with ModSecurity as shown in Tutorial 6 (Embedding ModSecurity).
We will be working with the new major release of the CRS, CRS3; short for CRS 3.0. The official distribution comes with an INSTALL file that does a good job explaining the setup (after all, yours truly wrote a good deal of that file), but we will tweak the process a bit to suit our needs.
Step 1: Downloading OWASP CRS
The CRS are being developed under the umbrella of OWASP, the Open Web Application Security Project. The rules themselves are available on GitHub and can be downloaded via git or with the following wget command:
$> cd /apache/conf
$> wget https://github.com/coreruleset/coreruleset/archive/refs/tags/v4.22.0.tar.gz
$> tar -xvzf v4.22.0.tar.gz
coreruleset-4.22.0
coreruleset-4.22.0/
coreruleset-4.22.0/.github/
coreruleset-4.22.0/.github/ISSUE_TEMPLATE.md
coreruleset-4.22.0/.gitignore
coreruleset-4.22.0/.gitmodules
coreruleset-4.22.0/.travis.yml
coreruleset-4.22.0/CHANGES
coreruleset-4.22.0/IDNUMBERING
coreruleset-4.22.0/INSTALL
coreruleset-4.22.0/KNOWN_BUGS
coreruleset-4.22.0/LICENSE
coreruleset-4.22.0/README.md
coreruleset-4.22.0/crs-setup.conf.example
coreruleset-4.22.0/documentation/
coreruleset-4.22.0/documentation/OWASP-CRS-Documentation/
coreruleset-4.22.0/documentation/README
...
$> ln -s coreruleset-4.22.0 /apache/conf/crs
$> cp crs/crs-setup.conf.example crs/crs-setup.conf
$> rm v4.22.0.tar.gz
This unpacks the base part of the CRS in the directory /apache/conf/coreruleset-4.22.0. We create a link from /apache/conf/crs to this folder. Then we copy a file named crs-setup.conf.example to a new file crs-setup.conf and finally, we delete the CRS tar file.
The setup file allows us to tweak many different settings. It is worth a look – if only to see what is included. However, we are OK with the default settings and will not touch the file: We just make sure it is available under the new filename crs-setup.conf. Then we can continue to update the configuration to include the rules files.
Step 2: Embedding the CRS
In Tutorial 6, where we embedded ModSecurity itself, we marked out a section for the CRS. We now add several Include directives into this section. Specifically, four parts are added to the existing configuration. (1) The CRS base configuration, (2) a part for self-defined rule exclusions before the CRS rules. Then (3) CRS themselves as well as CRS plugins and finally a part (4) for rule exclusions after CRS.
The rule exclusions are directives and rules used for managing the false alarms described above. Some false alarms must be prevented before the corresponding CRS rule is loaded. Some false alarms can only be intercepted following the definition of the rule itself. But one thing at a time. Here is the new block of configuration which we will insert into the base configuration we assembled when we enabled ModSecurity:
# === ModSec CRS Base Configuration (ids: 900000-900999)

Include    /apache/conf/crs/crs-setup.conf

SecAction "id:900110,phase:1,pass,nolog,\
  setvar:tx.inbound_anomaly_score_threshold=10000,\
  setvar:tx.outbound_anomaly_score_threshold=10000,\
  setvar:tx.blocking_paranoia_level=1,\
  setvar:tx.reporting_level=4"


# === ModSec CRS: Runtime Exclusion Rules (ids: 10000-49999)

# ...


# === CRS and CRS Plugin Inclusion

Include /apache/conf/crs/plugins/*-config.conf
Include /apache/conf/crs/plugins/*-before.conf

Include /apache/conf/crs/rules/*.conf

Include /apache/conf/crs/plugins/*-after.conf


# === ModSec CRS: Startup Time Rules Exclusions

# ...
The CRS comes with a base configuration file named crs-setup.conf which we prepared during the installation. Copying the original example file guarantees that we can update the CRS distribution without harming our copy of the config file unless we want to.
We have the option to edit settings in that base configuration file. However, the strategy for this series of tutorials has been to define all the important things in our single Apache configuration file. We do not want to insert the complete contents of the crs-setup.conf file into our configuration (but we include it) in order to get the minimal set of configuration items needed to run CRS. I do not want to dive into all the options in the settings file, but it is worth having a look at.
For now, we leave the file untouched, but we take four important values out of crs-setup.conf and define them in our config so we have them in sight at all times. We define two thresholds in the unconditional rule 900110: The inbound anomaly score and the outbound anomaly score. This is done via the setvar action which sets both values to 10000.
What does that mean? The CRS works with a scoring mechanism by default. For every rule a request violates, there is a score being raised. When all the request rules have passed, the score is compared to the limit. If if hits the limit, the request is blocked. The same thing happens with the responses, where we want to avoid information leaks to the client.
The CRS comes in blocking mode by default. If a rule is violated and the score hits the limit, the blocking will be effective immediately. But we are not yet sure our service runs smoothly and the danger of false alarms is always there. We want to avoid unwanted blocks, so we set the threshold at a value of 10000. Rule violations score 5 points at most, so even if cumulation is possible, a request is unlikely to hit the limit. Yet, we remain in blocking mode and when we grow more confident in our configuration, we can lower the threshold gradually.
Then we add the definition of another two variable to this rules. tx.blocking_paranoia_level, defines the Paranoia Level to 1. CRS rules are divided in four groups at paranoia levels 1 – 4. As the name suggests, the higher the paranoia level, the more paranoid the rules. The default is paranoia level 1, where the rules are quite sane and false alarms are rare. When you raise the PL to 2, additional rules are enabled. Starting with PL 2, you will face more and more false alarms, also called false positives. This number grows with PL3 and when you arrive at PL4, you are likely to face false alarms as though your web application firewall has become quite paranoid, so to speak. We will deal with false positives later in this tutorial, but for the moment you just need to be aware that you can control the aggressiveness of the rule set with the paranoia level setting and that PL3 and PL4 are really for advanced users with very high security needs.
And finally, we set the reporting level via tx.reporting_level. The reporting level configures a reporting rule that lists a summary of CRS for a given request. CRS can write this summary for every request, also those that did not trigger any alerts, it can write the summary for those requests that did, it can write it for requests that have been blocked or it can leave out that summary report. Depening on your use case, this information can be useful, but I personally run without it (-> reporting level 0).
Step 3: A closer look at the rules folder
The center of the previous config snippet follows the includes statement for CRS and any plugins. CRS v4 introduced an architecture for plugins. Plugins are rules with additional detection abilities or rules performing special tasks, that are not interesting for the majority of setups. We are not loading any plugins just yet, but we prepare the include directives, so we can drop plugins in the said folder in the future and have them enabled immediately.
The CRS include is the third in the row and it loads all files with suffix .conf from the rules sub folder in the CRS directory. This is where all the rules are being loaded. Let’s take a look at them:
$> ls -1 crs/rules/*.conf
crs/rules/REQUEST-901-INITIALIZATION.conf
crs/rules/REQUEST-905-COMMON-EXCEPTIONS.conf
crs/rules/REQUEST-911-METHOD-ENFORCEMENT.conf
crs/rules/REQUEST-913-SCANNER-DETECTION.conf
crs/rules/REQUEST-920-PROTOCOL-ENFORCEMENT.conf
crs/rules/REQUEST-921-PROTOCOL-ATTACK.conf
crs/rules/REQUEST-922-MULTIPART-ATTACK.conf
crs/rules/REQUEST-930-APPLICATION-ATTACK-LFI.conf
crs/rules/REQUEST-931-APPLICATION-ATTACK-RFI.conf
crs/rules/REQUEST-932-APPLICATION-ATTACK-RCE.conf
crs/rules/REQUEST-933-APPLICATION-ATTACK-PHP.conf
crs/rules/REQUEST-934-APPLICATION-ATTACK-GENERIC.conf
crs/rules/REQUEST-941-APPLICATION-ATTACK-XSS.conf
crs/rules/REQUEST-942-APPLICATION-ATTACK-SQLI.conf
crs/rules/REQUEST-943-APPLICATION-ATTACK-SESSION-FIXATION.conf
crs/rules/REQUEST-944-APPLICATION-ATTACK-JAVA.conf
crs/rules/REQUEST-949-BLOCKING-EVALUATION.conf
crs/rules/RESPONSE-950-DATA-LEAKAGES.conf
crs/rules/RESPONSE-951-DATA-LEAKAGES-SQL.conf
crs/rules/RESPONSE-952-DATA-LEAKAGES-JAVA.conf
crs/rules/RESPONSE-953-DATA-LEAKAGES-PHP.conf
crs/rules/RESPONSE-954-DATA-LEAKAGES-IIS.conf
crs/rules/RESPONSE-955-WEB-SHELLS.conf
crs/rules/RESPONSE-956-DATA-LEAKAGES-RUBY.conf
crs/rules/RESPONSE-959-BLOCKING-EVALUATION.conf
crs/rules/RESPONSE-980-CORRELATION.conf
The rule files are grouped by request and response rules. We start off with an initialization rule file. There are a lot of things commented out in the crs-setup.conf file. These values are simply set to their default value in the 901 rule file. This helps keep the config neat and tidy and still have all default settings applied. Then we have two application specific rule files for WordPress and Drupal, followed by an exceptions file that is mostly irrelevant to us. Starting with 910, we have the real rules.
Every file is dedicated to a topic or type of attack. The CRS occupies the ID namespace from 900,000 to 999,999. The three digit long numbers in the filenames correspond to the first three digits of the IDs of the rules managed within the file. This means the IP reputation rules in REQUEST-910-IP-REPUTATION.conf will occupy the rule range 910,000 – 910,999. The method enforcement rules follow between 911,000 and 911,999, etc.. Some of these rule files are small and they do not use up their assigned rule range by far. Others are much bigger and the infamous SQL Injection rules run the risk of touching their ID ceiling one day.
An important rule file is REQUEST-949-BLOCKING-EVALUATION.conf. This is where the anomaly score is checked against the inbound threshold and the request is blocked accordingly.
Then begin the outbound rules, which are less numerous and basically check for code leakages (stack traces!) and leakages in error messages (which give an attacker useful information to construct an SQL injection attack). The outbound score is checked in the file with the 980 prefix.
Some of the rules come with data files. These files have a .data extension and reside in the same folder with the rule files. Data files are typically used when the request has to be checked against a long list of keywords, like unwanted user agents or php function names. Have a look if you are interested.
Before and after the rules Include directive in our Apache configuration file, there is a bit of configuration space reserved. This is where we will be handling false alarms in the future. Some of them are being treated before the rules are loaded in the configuration, some after the Include directive. We’ll return to this later in this tutorial.
For completeness, here is the complete Apache configuration including ModSecurity, CRS and all the other config bits from the earlier tutorials that we depend on:
ServerName        localhost
ServerAdmin       root@localhost
ServerRoot        /apache
User              www-data
Group             www-data
PidFile           logs/httpd.pid

ServerTokens      Prod
UseCanonicalName  On
TraceEnable       Off

Timeout           10
MaxRequestWorkers 100

Listen            127.0.0.1:80
Listen            127.0.0.1:443

LoadModule        mpm_event_module        modules/mod_mpm_event.so
LoadModule        unixd_module            modules/mod_unixd.so

LoadModule        log_config_module       modules/mod_log_config.so
LoadModule        logio_module            modules/mod_logio.so

LoadModule        authn_core_module       modules/mod_authn_core.so
LoadModule        authz_core_module       modules/mod_authz_core.so

LoadModule        ssl_module              modules/mod_ssl.so
LoadModule        headers_module          modules/mod_headers.so

LoadModule        unique_id_module        modules/mod_unique_id.so
LoadModule        security2_module        modules/mod_security2.so

ErrorLogFormat          "[%{cu}t] [%-m:%-l] %-a %-L %M"
LogFormat "%h %{GEOIP_COUNTRY_CODE}e %u [%{%Y-%m-%d %H:%M:%S}t.%{usec_frac}t] \"%r\" %>s %b \
\"%{Referer}i\" \"%{User-Agent}i\" \"%{Content-Type}i\" %{remote}p %v %A %p %R \
%{BALANCER_WORKER_ROUTE}e %X \"%{cookie}n\" %{UNIQUE_ID}e %{SSL_PROTOCOL}x %{SSL_CIPHER}x \
%I %O %{ratio}n%% %D %{ModSecTimeIn}e %{ApplicationTime}e %{ModSecTimeOut}e \
%{ModSecAnomalyScoreInPLs}e %{ModSecAnomalyScoreOutPLs}e \
%{ModSecAnomalyScoreIn}e %{ModSecAnomalyScoreOut}e" extended

LogFormat "[%{%Y-%m-%d %H:%M:%S}t.%{usec_frac}t] %{UNIQUE_ID}e %D \
PerfModSecInbound: %{TX.perf_modsecinbound}M \
PerfAppl: %{TX.perf_application}M \
PerfModSecOutbound: %{TX.perf_modsecoutbound}M \
TS-Phase1: %{TX.ModSecTimestamp1start}M-%{TX.ModSecTimestamp1end}M \
TS-Phase2: %{TX.ModSecTimestamp2start}M-%{TX.ModSecTimestamp2end}M \
TS-Phase3: %{TX.ModSecTimestamp3start}M-%{TX.ModSecTimestamp3end}M \
TS-Phase4: %{TX.ModSecTimestamp4start}M-%{TX.ModSecTimestamp4end}M \
TS-Phase5: %{TX.ModSecTimestamp5start}M-%{TX.ModSecTimestamp5end}M \
Perf-Phase1: %{PERF_PHASE1}M \
Perf-Phase2: %{PERF_PHASE2}M \
Perf-Phase3: %{PERF_PHASE3}M \
Perf-Phase4: %{PERF_PHASE4}M \
Perf-Phase5: %{PERF_PHASE5}M \
Perf-ReadingStorage: %{PERF_SREAD}M \
Perf-WritingStorage: %{PERF_SWRITE}M \
Perf-GarbageCollection: %{PERF_GC}M \
Perf-ModSecLogging: %{PERF_LOGGING}M \
Perf-ModSecCombined: %{PERF_COMBINED}M" perflog

LogLevel                      debug
ErrorLog                      logs/error.log
CustomLog                     logs/access.log extended
CustomLog                     logs/modsec-perf.log perflog env=write_perflog

# == ModSec Base Configuration

SecRuleEngine                 On

SecRequestBodyAccess          On
SecRequestBodyLimit           10000000
SecRequestBodyNoFilesLimit    64000

SecResponseBodyAccess         On
SecResponseBodyLimit          10000000

SecPcreMatchLimit             100000
SecPcreMatchLimitRecursion    100000
SecRequestBodyJsonDepthLimit  16

SecTmpDir                     /tmp/
SecUploadDir                  /tmp/
SecDataDir                    /tmp/

SecDebugLog                   /apache/logs/modsec_debug.log
SecDebugLogLevel              0

SecAuditEngine                RelevantOnly
SecAuditLogRelevantStatus     "^(?:5|4(?!04))"
SecAuditLogParts              ABIJEFHKZ

SecAuditLogType               Concurrent
SecAuditLog                   /apache/logs/modsec_audit.log
SecAuditLogStorageDir         /apache/logs/audit/

SecDefaultAction              "phase:2,pass,log,tag:'Local Lab Service'"


# == ModSec Rule ID Namespace Definition
# Service-specific before CRS: 10000 -  49999
# Service-specific after CRS:  50000 -  79999
# Locally shared rules:                  80000 -  99999
#  - Performance:                        90000 -  90199
# Recommended ModSec Rules (few):       200000 - 200010
# OWASP CRS:                  900000 - 999999


# === ModSec timestamps at the start of each phase (ids: 90000 - 90009)

SecAction "id:90000,phase:1,nolog,pass,setvar:TX.ModSecTimestamp1start=%{DURATION}"
SecAction "id:90001,phase:2,nolog,pass,setvar:TX.ModSecTimestamp2start=%{DURATION}"
SecAction "id:90002,phase:3,nolog,pass,setvar:TX.ModSecTimestamp3start=%{DURATION}"
SecAction "id:90003,phase:4,nolog,pass,setvar:TX.ModSecTimestamp4start=%{DURATION}"
SecAction "id:90004,phase:5,nolog,pass,setvar:TX.ModSecTimestamp5start=%{DURATION}"

# SecRule REQUEST_FILENAME "@beginsWith /" "id:90005,phase:5,t:none,nolog,noauditlog,pass,\
# setenv:write_perflog"


# === ModSec Recommended Rules (in modsec src package) (ids: 200000-200010)

SecRule REQUEST_HEADERS:Content-Type "(?:application(?:/soap\+|/)|text/)xml" \
  "id:200000,phase:1,t:none,t:lowercase,pass,nolog,ctl:requestBodyProcessor=XML"

SecRule REQUEST_HEADERS:Content-Type "application/json" \
  "id:200001,phase:1,t:none,t:lowercase,pass,nolog,ctl:requestBodyProcessor=JSON"

SecRule REQBODY_ERROR "!@eq 0" \
  "id:200002,phase:2,t:none,deny,status:400,log,msg:'Failed to parse request body.',\
  logdata:'%{reqbody_error_msg}',severity:2"

SecRule MULTIPART_STRICT_ERROR "!@eq 0" \
"id:200003,phase:2,t:none,log,deny,status:403, \
msg:'Multipart request body failed strict validation: \
PE %{REQBODY_PROCESSOR_ERROR}, \
BQ %{MULTIPART_BOUNDARY_QUOTED}, \
BW %{MULTIPART_BOUNDARY_WHITESPACE}, \
DB %{MULTIPART_DATA_BEFORE}, \
DA %{MULTIPART_DATA_AFTER}, \
HF %{MULTIPART_HEADER_FOLDING}, \
LF %{MULTIPART_LF_LINE}, \
SM %{MULTIPART_MISSING_SEMICOLON}, \
IQ %{MULTIPART_INVALID_QUOTING}, \
IP %{MULTIPART_INVALID_PART}, \
IH %{MULTIPART_INVALID_HEADER_FOLDING}, \
FL %{MULTIPART_FILE_LIMIT_EXCEEDED}'"

SecRule TX:/^MSC_/ "!@streq 0" \
  "id:200005,phase:2,t:none,deny,status:500,\
  msg:'ModSecurity internal error flagged: %{MATCHED_VAR_NAME}'"


# === ModSec CRS Base Configuration (ids: 900000-900999)

Include    /apache/conf/crs/crs-setup.conf

SecAction "id:900110,phase:1,pass,nolog,\
  setvar:tx.inbound_anomaly_score_threshold=10000,\
  setvar:tx.outbound_anomaly_score_threshold=10000,\
  setvar:tx.blocking_paranoia_level=1,\
  setvar:tx.reporting_level=0"


# === ModSec CRS: Runtime Exclusion Rules (ids: 10000-49999)

# ...


# === CRS and CRS Plugin Inclusion

Include /apache/conf/crs/plugins/*-config.conf
Include /apache/conf/crs/plugins/*-before.conf

Include /apache/conf/crs/rules/*.conf

Include /apache/conf/crs/plugins/*-after.conf


# === ModSec CRS: Startup Time Rules Exclusions

# ...


# === ModSec Timestamps at the End of Each Phase (ids: 90010 - 90019)

SecAction "id:90010,phase:1,pass,nolog,setvar:TX.ModSecTimestamp1end=%{DURATION}"
SecAction "id:90011,phase:2,pass,nolog,setvar:TX.ModSecTimestamp2end=%{DURATION}"
SecAction "id:90012,phase:3,pass,nolog,setvar:TX.ModSecTimestamp3end=%{DURATION}"
SecAction "id:90013,phase:4,pass,nolog,setvar:TX.ModSecTimestamp4end=%{DURATION}"
SecAction "id:90014,phase:5,pass,nolog,setvar:TX.ModSecTimestamp5end=%{DURATION}"


# === ModSec performance calculations and variable export (ids: 90100 - 90199)

SecAction "id:90100,phase:5,pass,nolog,\
  setvar:TX.perf_modsecinbound=%{PERF_PHASE1},\
  setvar:TX.perf_modsecinbound=+%{PERF_PHASE2},\
  setvar:TX.perf_application=%{TX.ModSecTimestamp3start},\
  setvar:TX.perf_application=-%{TX.ModSecTimestamp2end},\
  setvar:TX.perf_modsecoutbound=%{PERF_PHASE3},\
  setvar:TX.perf_modsecoutbound=+%{PERF_PHASE4},\
  setenv:ModSecTimeIn=%{TX.perf_modsecinbound},\
  setenv:ApplicationTime=%{TX.perf_application},\
  setenv:ModSecTimeOut=%{TX.perf_modsecoutbound},\
  setenv:ModSecAnomalyScoreInPLs=%{TX.inbound_anomaly_score_pl1}-%{TX.inbound_anomaly_score_pl2}-%{TX.inbound_anomaly_score_pl3}-%{TX.inbound_anomaly_score_pl4},\
  setenv:ModSecAnomalyScoreOutPLs=%{TX.outbound_anomaly_score_pl1}-%{TX.outbound_anomaly_score_pl2}-%{TX.outbound_anomaly_score_pl3}-%{TX.outbound_anomaly_score_pl4},\
  setenv:ModSecAnomalyScoreIn=%{TX.blocking_inbound_anomaly_score},\
  setenv:ModSecAnomalyScoreOut=%{TX.blocking_outbound_anomaly_score}"


SSLCertificateKeyFile   /etc/ssl/private/ssl-cert-snakeoil.key
SSLCertificateFile      /etc/ssl/certs/ssl-cert-snakeoil.pem

SSLProtocol             All -SSLv2 -SSLv3 -TLSv1 -TLSv1.1
SSLCipherSuite          'kEECDH+ECDSA kEECDH kEDH HIGH +SHA !aNULL !eNULL !LOW !MEDIUM !MD5 !EXP !DSS \
!PSK !SRP !kECDH !CAMELLIA !RC4'
SSLHonorCipherOrder     On

SSLRandomSeed           startup file:/dev/urandom 2048
SSLRandomSeed           connect builtin

DocumentRoot        /apache/htdocs

<Directory />

    Require all denied

    Options SymLinksIfOwnerMatch

</Directory>

<VirtualHost 127.0.0.1:80>

      <Directory /apache/htdocs>

        Require all granted

        Options None

      </Directory>

</VirtualHost>

<VirtualHost 127.0.0.1:443>

      SSLEngine On
      Header always set Strict-Transport-Security "max-age=31536000; includeSubDomains" env=HTTPS


      <Directory /apache/htdocs>

              Require all granted

              Options None

      </Directory>

</VirtualHost>
We have embedded the CRS and are now ready for a test operation. The rules inspect requests and responses. They will trigger alarms if they encounter fishy requests, but they will not block any transaction, because the limits have been set very high. Let’s give it a shot.
Step 4: Triggering alarms for testing purposes
For starters, we will do something easy. It is a request that will trigger exactly one rule by attempting to execute a bash shell. We know that our simple lab server is not vulnerable to such a blatant attack, but ModSecurity does not know this and will still try to protect us:
$> curl localhost/index.html?exec=/bin/bash
<!DOCTYPE HTML PUBLIC "-//W3C//DTD HTML 4.01//EN" "http://www.w3.org/TR/html4/strict.dtd">
<html>
<head>
<title>It works! Apache httpd</title>
</head>
<body>
<p>It works!</p>
</body>
</html>
As predicted, we have not been blocked, but let’s check the logs to see if anything happened:
$> tail -1 /apache/logs/access.log
127.0.0.1 - - [2026-01-20 12:48:39.414556] "GET /index.html?exec=/bin/bash HTTP/1.1" 200 191 "-" …
"curl/8.14.1" "-" 35054 localhost 127.0.0.1 80 - - + "-" aW9rl_uSFsccG5-mOAeHXQAAAAA - - 98 378 …
-% 5848 3490 88 774 5-0-0-0 0-0-0-0 5 0
It looks like a standard GET request with a status 200. The interesting bit is the second field from the end. In the log file tutorial, we defined a lengthy Apache access log format with two items reserved for the anomaly score. So far, these values have been empty; now they are being filled. The first of the two numbers at the end is the request’s inbound anomaly score. Our submission of /bin/bash as parameter got us a score of 5. This is considered a critical rule violation by CRS. An error level violation is set at 4, a warning at 3 and a notice at 2. However, if you look over the rules in all the files, most of them score as critical violations with a score of 5.
But now we want to know what rule triggered the alert. This information can be found in the error log. We could simply tail the error log and look at the last entry but in a real world scenario, this entry might be buried somewhere in the middle of the error log. Therefore we find the request ID in the access log entry and then search for all entries in the error log that are related to that request ID.
[2026-01-20 12:48:39.416127] [authz_core:debug] 127.0.0.1:35054 aW9rl_uSFsccG5-mOAeHXQAAAAA …
AH01626: authorization result of Require all granted: granted
[2026-01-20 12:48:39.416180] [authz_core:debug] 127.0.0.1:35054 aW9rl_uSFsccG5-mOAeHXQAAAAA …
AH01626: authorization result of <RequireAny>: granted
[2026-01-20 12:48:39.417069] [security2:error] 127.0.0.1:35054 aW9rl_uSFsccG5-mOAeHXQAAAAA …
ModSecurity: Warning. Matched phrase "bin/bash" at ARGS:exec. [file "/apache/conf/crs/rules/…
REQUEST-932-APPLICATION-ATTACK-RCE.conf"] [line "650"] [id "932160"] [msg "Remote Command …
Execution: Unix Shell Code Found"] [data "Matched Data: bin/bash found within ARGS:exec: …
/bin/bash"] [severity "CRITICAL"] [ver "OWASP_CRS/4.22.0"] [tag "application-multi"] [tag …
"language-shell"] [tag "platform-unix"] [tag "attack-rce"] [tag "paranoia-level/1"] [tag …
"OWASP_CRS"] [tag "OWASP_CRS/ATTACK-RCE"] [tag "capec/1000/152/248/88"] [hostname "localhost"] …
[uri "/index.html"] [unique_id "aW9rl_uSFsccG5-mOAeHXQAAAAA"]
[2026-01-20 12:48:39.420014] [security2:error] 127.0.0.1:35054 aW9rl_uSFsccG5-mOAeHXQAAAAA …
ModSecurity: Warning. Unconditional match in SecAction. [file …
"/apache/conf/crs/rules/RESPONSE-980-CORRELATION.conf"] [line "98"] [id "980170"] [msg …
"Anomaly Scores: (Inbound Scores: blocking=5, detection=5, per_pl=5-0-0-0, threshold=1000) -…
(Outbound Scores: blocking=0, detection=0, per_pl=0-0-0-0, threshold=1000) - (SQLI=0, XSS=0, …
RFI=0, LFI=0, RCE=5, PHPI=0, HTTP=0, SESS=0, COMBINED_SCORE=5)"] [ver "OWASP_CRS/4.22.0"] [tag …
"reporting"] [tag "OWASP_CRS"] [hostname "localhost"] [uri "/index.html"] [unique_id …
"aW9rl_uSFsccG5-mOAeHXQAAAAA"]
The authorization modules report twice in the log file since we are running on level debug. But on the third line, we see the rule alert we are looking for. Let’s look at this in detail. The CRS messages contain much more information than normal Apache messages, making it worthwhile to discuss the log format once more.
The beginning of the line consists of the Apache-specific parts such as the timestamp and the severity of the message as the Apache server sees it. ModSecurity messages are always set to error level. ModSecurity’s alert format and the Apache error log format we configured lead to some redundancy. The first occurrence client IP address with the source port number and the unique ID of the request are fields written by Apache. The square bracket with the same client IP address again marks the beginning of ModSecurity’s alert message. The characteristic marker of a CRS alert is ModSecurity: Warning. It describes a rule being triggered without blocking the request. This is because the alert only raised the anomaly score. It is very easy to distinguish between the issuing of alarms and actual blocking in the Apache error log. Particularly since the individual CRS rules increase the anomaly score, but they do not trigger a blockade. The blockade itself is performed by a separate blocking rule taking the limit into account. But given the insanely high limit, this is not expected to appear anytime soon. ModSecurity logs normal rule violations in the error log as ModSecurity. Warning …, and blockades will be logged as ModSecurity. Access denied …. A warning never has any direct impact on the client: Unless you see the Access denied …, the client was unaffected.
What comes next? A reference to the pattern found in the request. The specific phrase /bin/bash was found in the argument exec. Then comes a series of information chunks that always have the same pattern: They are within square brackets and have their own identifier. First you’ll see the file identifier. It shows us the file in which the rule that triggered the alarm is defined. This is followed by line for the line number within the file. The id parameter is an important one. The rule in question, 932160, can be found in the set of rules that defend against remote command execution in the 932,000 – 932,999 rule block. Then comes rev as a reference to the revision number of the rule. In CRS, this parameter expresses how often the rule has been revised. If a modification is made to a rule, the developer that makes the change increases the rule’s rev by one. However, this is not always done in practice and should not be relied upon. msg, short for message, describes the type of attack detected. The relevant part of the request, the exec parameter appears in data. In my example, this is obviously a case of Remote Code Execution (RCE).
Then we have the severity level of the rule that set off the alarm and corresponds with the anomaly score of the rule. We have already established the fact that our rule is considered critical, that’s why it is being reported here at this severity. At ver, we come to the release of the CRS, followed by maturity and then accuracy. Both values are meant to be references to the quality of the rule. But the support is in fact inconsistent and you should not trust these values very much.
What follows is a series of tags assigned to the rule. They are included along with every alert message. These tags often classify the type of attack. These references can, for example, be used for analysis and statistics. Towards the end of the alarm comes three additional values, hostname, uri and unique_id, that more clearly specify the request (the unique_id, already listed by Apache, is somewhat redundant).
With this, we have covered the full alert message that led to the inbound anomaly score of 5.
But there is another rule in the dump above, 980170, that has been mentioned above. This is said reporting rule. It brings a summary of the anomaly score per paranoia level and also per attack category, very much like the access log and the alert message. So the information here is mostly redundant. That’s why I personally do not rely on it in production. Yet there are platforms, where you can not show the anomaly score of a request in the access log. In such a situation, this reporting rule is very useful.
But as far as we are concerned here, let’s disable this rule as follows (and don’t forget to restart the server):
SecAction "id:900110,phase:1,pass,nolog,\
  setvar:tx.inbound_anomaly_score_threshold=10000,\
  setvar:tx.outbound_anomaly_score_threshold=10000,\
  setvar:tx.blocking_paranoia_level=1,\
  setvar:tx.reporting_level=0"
Now the alerts above were only triggered by a single request. Let’s generate more alerts. Nikto is a simple tool that can help us in this situation. It’s a security scanner that has been around for ages. It’s not very proficient, but it is fast and easy to use. Just the right tool to generate alerts for us. Nikto may still have to be installed. The scanner is, however, included in most distributions.
$> nikto -h localhost
- Nikto v2.1.5
---------------------------------------------------------------------------
+ Target IP:          127.0.0.1
+ Target Hostname:    localhost
+ Target Port:        80
+ Start Time:         2026-01-20 13:28:49 (GMT1)
---------------------------------------------------------------------------
+ Server: Apache
+ The anti-clickjacking X-Frame-Options header is not present.
+ No CGI Directories found (use '-C all' to force check all possible dirs)
+ Server leaks inodes via ETags, header found with file /index.html, fields: 0xbf 0x642fce432f300
+ Allowed HTTP Methods: GET, POST, OPTIONS, HEAD
+ 6544 items checked: 0 error(s) and 3 item(s) reported on remote host
+ End Time:           2026-01-20 13:29:05 (GMT1) (16 seconds)
---------------------------------------------------------------------------
+ 1 host(s) tested
This scan should have triggered numerous ModSecurity alarms on the server. Let’s take a close look at the Apache error log. In my case, there were over 13,000 entries in the error log. Combine this with the authorization messages and infos on many 404s (Nikto probes for files that do not exist on the server) and you end up with a fast-growing error log. The single Nikto run resulted in an 11 MB logfile. Looking over the audit log tree reveals 92 MB of logs. It’s obvious: you need to keep a close eye on these log files or your server will collapse due to denial of service via log file exhaustion.
Step 5: Analyzing the alert messages
So we are looking at 13,000 alerts. And even if the format of the entries in the error log may be clear, without a tool they are very hard to read, let alone analyze. A simple remedy is to use a few shell aliases, which extract individual pieces of information from the entries. They are stored in the alias file we discussed in the log format in Tutorial 5.
$> cat ~/.apache-modsec.alias
...
alias meldata='grep -o "\[data [^]]*" | cut -d\" -f2'
alias melfile='grep -o "\[file [^]]*" | cut -d\" -f2'
alias melhostname='grep -o "\[hostname [^]]*" | cut -d\" -f2'
alias melid='grep -o "\[id [^]]*" | cut -d\" -f2'
alias melip='grep -E -o "error\] [^ ]*" | cut -d\  -f2 | sed -e "s/:[0-9]\{4,\}//"'
alias melidmsg='sed -e "/\(compiled version\|Status engine is currently\)/d" -e "s/.*\[id \"//" -e "s/PCRE limits exceeded/[msg \"ERROR while processing rule: PCRE limits exceeded\"]/" -e "s/\([0-9]*\).*\[msg \"/\1 /" -e "s/\"\].*//" -e "s/(Total .*/(Total ...) .../" -e "s/Incoming and Outgoing Score: [0-9]* [0-9]*/Incoming and Outgoing Score: .../" -e "s/Anomaly Scores: .*/Anomaly Scores: (Inbound Scores: ...) - (Outbound Scores: ...) - .../"'
alias melline='grep -o "\[line [^]]*" | cut -d\" -f2'
alias melmatch='grep -o " at [^\ ]*\. \[file" | sed -e "s/\. \[file//" | cut -b5-'
alias melmsg='grep -o "\[msg [^]]*" | cut -d\" -f2 | sed -e "s/(Total .*/(Total ...) .../" -e "s/Anomaly Scores: .*/Anomaly Scores: (Inbound Scores: ...) - (Outbound Scores: ...) - .../"'
alias meltimestamp='cut -b2-25'
alias melunique_id='grep -o "\[unique_id [^]]*" | cut -d\" -f2'
alias meluri='grep -o "\[uri [^]]*" | cut -d\" -f2'
...
These abbreviations all start with the prefix mel, short for ModSecurity error log, followed by the field name. Let’s try it out to output the rule IDs from the alerts:
$> cat logs/error.log | melid
...
913100
920440
913100
913100
913100
913100
913100
913100
913100
920440
This seems to do the job. So let’s extend the example with a few steps:
$> cat logs/error.log | melid | sort | uniq -c | sort -n
...
    171 930120
    244 941100
    254 920440
    273 941110
    277 941160
    282 930100
    314 941390
    539 930110
   2262 931120
   6207 913100
$> cat logs/error.log | melidmsg | sucs
...
    171 930120 OS File Access Attempt
    244 941100 XSS Attack Detected via libinjection
    254 920440 URL file extension is restricted by policy
    273 941110 XSS Filter - Category 1: Script Tag Vector
    277 941160 NoScript XSS InjectionChecker: HTML Injection
    282 930100 Path Traversal Attack (/../) or (/.../)
    314 941390 Javascript method detected
    539 930110 Path Traversal Attack (/../) or (/.../)
   2262 931120 Possible Remote File Inclusion (RFI) Attack: URL Payload Used w/Trailing ...
   6207 913100 Found User-Agent associated with security scanner
This is something we can work with. But it’s perhaps necessary to explain the one-liners used if you did not read through all the previous tutorials. We extract the rule IDs from the error log, then sort them, group them together in a list of found IDs (uniq -c) and sort again by the numbers found. That’s the first one-liner. A relationship between the individual rules is still lacking, this is where melidmsg comes in. This alias apparently extracts the rule id as well as the alert message. The problem is that there can be dynamic parts in the message. If you unique those, you end up with multiple entries, one for each number combination. So the melidmsg alias takes that into account and covers various special cases on top.
Coming back to the output above, we can see that CRS detected a lot of malicious requests and we now have an idea which rules played a role in this. The rule triggered most frequently, 913100, is no surprise, and when you look upwards in the output, this all makes a lot of sense.
Step 6: Evaluating false alarms
So the Nikto scan set off thousands of alarms. They were likely justified. In the normal use of ModSecurity, things are a bit different. The CRS is designed and optimized to have as few false alarms as possible in paranoia level 1. But in production use, there are going to be false positives sooner or later. Depending on the application, a normal installation will also see alarms and a lot of them will be false. And when you raise the paranoia level to become more vigilant towards attacks, the number of false positives will also rise. Actually, it will rise steeply when you move to PL 3 or 4; so steeply, some would call it exploding.
In order to run smoothly, the configuration has to be fine tuned first: Legitimate requests and malicious exploitation attempts need to be distinct. We want to achieve a high degree of separation between the two. We wish to configure ModSecurity and the CRS so the engine knows exactly how to distinguish between legitimate requests and attacks.
We differentiate between two categories of errors when examining requests. We already discussed false positives (or false alarms) above. The other category of errors is called false negatives and they consist of attacks that are not detected. CRS is strict and careful to keep the number of false negatives low. An attacker needs to possess a great deal of savvy to circumvent the system of rules, especially at higher paranoia levels. Unfortunately, this strictness also results in alarms being triggered for normal requests. It is commonly the case that at a low degree of separation, you either get a lot of false negatives or a lot of false positives. Reducing the number of false negatives leads to an increase in false positives and vice versa. Both correlate highly with one another.
We have to overcome this link: We want to increase the degree of separation in order to reduce the number of false positives without increasing the number of false negatives. We can do this by fine tuning the system of rules in a few places. We have to exclude certain rules from being executed for certain requests or parameters. But first we need to have a clear picture of the current situation: How many false positives are there and which of the rules are being violated in a particular context? How many false positives are we willing to allow on the system? Reducing them to zero will be extremely difficult to do, but percentages are something we can work with. A possible target would be: 99.999% of legitimate requests should pass without being blocked by the web application firewall. This is realistic, but involves a bit of work depending on the application. 99.999% of requests without a false alarm is also a number where professional use starts in my experience. But I have setups where we are not willing to accept more than 1 false alarm in 1 million of requests. That’s 99.9999%.
To reach such a goal, we will need one or two tools to help us get a good footing. Specifically, we need to find out about these numbers. Then, in a second step, we look at the error log to understand the rules that led to these alerts. We have seen that the access log reports the anomaly scores of the requests. Let’s try to extract these scores and to present them in a suitable form.
In Tutorial 5 we worked with a sample log file containing 10,000 entries. We’ll be using this log file again here: tutorial-5-example-access.log. The file comes from a real server, but the IP addresses, server names and paths have been simplified or rewritten. However, the information we need for our analysis is still there. Let’s have a look at the distribution of anomaly scores:
$> grep -E -o "[0-9-]+ [0-9-]+$" tutorial-5-example-access.log | cut -d\  -f1 | sucs
      3 10
      5 3
      6 2
     55 5
   9931 0
$> grep -E -o "[0-9-]+$" tutorial-5-example-access.log | sucs
  10000 0
The first command line reads the inbound anomaly score. It’s the second-to-last value in the access log line. We take the two last values (grep -E) and then cut the first one out. We then sort the results using the familiar sucs alias. The outbound anomaly score is the last value in the log line. This is why there is no cut command on the second command line.
The results give us an idea of the situation: The vast majority of requests pass the inspection by CRS with no rule violation: 9931 requests with score 0. 69 requests violated one or more rules. This is not a standard situation for CRS. In fact, I provoked additional false alarms to give us something to look at. The CRS is so optimized these days that you need a lot of traffic to get a reasonable amount of alerts – or you need to raise the paranoia level very high on a non-tuned system.
A score of 10 appears three times, corresponding to two violations in the same request (most rules score 5 points when violated), which is fairly standard in practice. In all likelihood, we will be seeing a fair number of violations from the requests and very few alarms from the responses; 0 in our example above.
But this still doesn’t give us the right idea about the tuning steps that would be needed to run this install smoothly. To present this information in a suitable form, I have prepared a ruby script that analyzes anomaly scores. You can download the script here: modsec-positive-stats.rb and place it in your private bin directory (You might have to install the ruby package to get it working). It takes the two anomaly scores as input and we need to separate them with a semicolon in order to pipe them into the script. We can do this like this:
$> cat tutorial-5-example-access.log  | grep -E -o "[0-9-]+ [0-9-]+$" | tr " " ";" | modsec-positive-stats.rb
INCOMING                     Num of req. | % of req. |  Sum of % | Missing %
Number of incoming req. (total) |  10000 | 100.0000% | 100.0000% |   0.0000%

Empty or miss. incoming score   |      0 |   0.0000% |   0.0000% | 100.0000%
Reqs with incoming score of   0 |   9931 |  99.3100% |  99.3100% |   0.6900%
Reqs with incoming score of   1 |      0 |   0.0000% |  99.3100% |   0.6900%
Reqs with incoming score of   2 |      6 |   0.0600% |  99.3700% |   0.6300%
Reqs with incoming score of   3 |      5 |   0.0500% |  99.4200% |   0.5800%
Reqs with incoming score of   4 |      0 |   0.0000% |  99.4200% |   0.5800%
Reqs with incoming score of   5 |     55 |   0.5499% |  99.9700% |   0.0300%
Reqs with incoming score of   6 |      0 |   0.0000% |  99.9700% |   0.0300%
Reqs with incoming score of   7 |      0 |   0.0000% |  99.9700% |   0.0300%
Reqs with incoming score of   8 |      0 |   0.0000% |  99.9700% |   0.0300%
Reqs with incoming score of   9 |      0 |   0.0000% |  99.9700% |   0.0300%
Reqs with incoming score of  10 |      3 |   0.0300% | 100.0000% |   0.0000%

Incoming average:   0.0332    Median   0.0000    Standard deviation   0.4163


OUTGOING                     Num of req. | % of req. |  Sum of % | Missing %
Number of outgoing req. (total) |  10000 | 100.0000% | 100.0000% |   0.0000%

Empty or miss. outgoing score   |      0 |   0.0000% |   0.0000% | 100.0000%
Reqs with outgoing score of   0 |  10000 | 100.0000% | 100.0000% |   0.0000%

Outgoing average:   0.0000    Median   0.0000    Standard deviation   0.0000
Please notice how there is an alias alscores that delivers exactly the format prepared by the grep and tr above.
The script divides the inbound from the outbound anomaly scores. The incoming ones are handled first. Before the script can handle the scores, it describes how often an empty anomaly score has been found (empty incoming score). In our case, this did not happen at all. Then comes the statement about score 0: 9931 requests. This is covering 99.31% of the requests. 0.69% had a higher anomaly score (Missing %). Above, we set out to have 99.999% of requests able to pass the server. We are about 0.69% or 69 requests away from this target. The next anomaly score is 2. It appears 6 times or 0.06%. The anomaly score 3 appears 5 times and a score of 5 can be seen 55 times, a small cluster in the results. All in all, we are at 99.97%. Then there are 3 requests with a score of 10. To achieve 99.999% coverage we have get to this limit (and, based on the example log file, this would achieve 100% coverage).
There are probably some false positives. In practice, we have to make certain of this before we start fine tuning the rules. It would be totally wrong to assume a false positive based on a justified alarm and suppress the alarm in the future. Before tuning, we must ensure that no attacks are present in the log file. This is not always easy. Manual review helps, restricting to known IP addresses, pre-authentication, testing/tuning on a test system separated from the internet, filtering the access log by country of origin for the IP address, etc… It’s a big topic and making general recommendations is difficult. But please do take this seriously. As a side-note, netnea offers a suite of tools calls C-Rex that performs the triage for you. See c-rex.netnea.com for more information.
Step 7: Handling false positives: Disabling individual rules
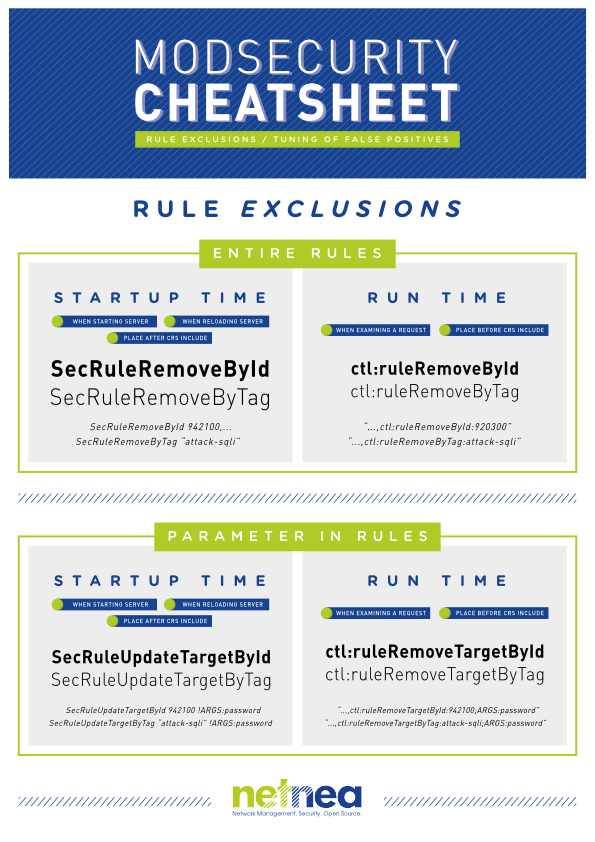
The simple way of dealing with a false positive is to simply disable the rule. We are thus making the alarm disappear by excluding a certain rule from the rule set. The CRS term for this technique is called Rules Exclusion or Exclusion Rules. It is called Rule because this exclusion involved writing rules or directives resembling rules themselves.
Excluding a rule completely takes very little effort, but it is, of course, potentially risky because the rule is not being disabled for just legitimate users, but for attackers as well. By completely disabling a rule, we are restricting the capability of ModSecurity. Or, expressed more drastically, we’re pulling the teeth out of the WAF.
Especially at higher paranoia levels, there are rules that just fail to work with some applications and trigger false alarms in all sorts of situations. So there is a use for disabling a rule completely. One notable example is rule ID 920300: Request Missing an Accept Header. There are just so many user agents that submit requests without an accept header, there is a rule dedicated to the problem. Let’s raise the paranoia level to 2 by setting the tx.blocking_paranoia_level variable to 2 in our config. Then we will send a request without an Accept header to trigger an alert as follows (I recommend returning the paranoia level to 1 again afterwards):
$> curl -v -H "Accept:" http://localhost/index.html
...
> GET /index.html HTTP/1.1
> User-Agent: curl/7.47.0
> Host: localhost
...
$> tail /apache/logs/error.log | melidmsg | mappl
920300 PL3 Request Missing an Accept Header
Notice the use of the mappl alias. It takes a rule id and appends the paranoia level of the rule.
So the rule has been triggered as desired. Let us now exclude the rule. We have multiple options and we start with the simplest one: We exclude the rule at startup time for Apache. This means it removes the rule from the set of loaded rules and no processor cycles will be spent on the rule once the server has started. Of course, we can only remove things which have been loaded before. So this directive has to be placed after the CRS include statement. In the config recipe earlier in this tutorial, we reserved some space for these sorts of exclusion rules. We fill in our exclusion directive in this location:
# === ModSec CRS: Startup Time Rules Exclusions

# ModSec Exclusion Rule: 920300 Request Missing an Accept Header
SecRuleRemoveById 920300
The example comes with a comment, which describes the rule being excluded. This is a good practice, which you should adopt as well. We have the option to exclude by ID (as we just did), to add several comma separated rule IDs, to configure a rule range or we can select the rule by one of its tags. Here is an example using one of the tags of the rule 920300:
# ModSec Exclusion Rule: 920300 Request Missing an Accept Header
SecRuleRemoveByTag "^OWASP_CRS/PROTOCOL-ENFORCEMENT$"
As you can see, this directive accepts regular expressions as parameters and will disable all the rules arrying this tag – that’s a lot of rules in this example, so be careful.
Unfortunately, the support is not universal: For example, the OR functionality, expressed with a pipe character, is not implemented. In practice, you will have to try it out and see for yourself what works and what does not.
Technically, there is an additional directive, SecRuleRemoveByMsg. However, the messages are not guaranteed to be stable between releases and they are not very consistent anyways. So you should not try to build exlcusion rules for the CRS via this directive.
So these are ways to disable an entire rule at startup time. Excluding a rule in this manner is simple and readable, but it is also a drastic step which we will not use in a production setup very often. Because, if our issues with the rule 920300 are limited to a single legitimate agent checking the availability of our service by requesting the index page, we can limit the exclusion to this individual request. This is no longer a startup time rule exclusion, but a runtime exclusion which is being applied on certain conditions. Runtime exclusions leverage the SecRule directive combined with a special action executing the rule exclusion. This depends on the SecRule statement running before the rule in question is applied. That’s why runtime rule exclusions have to be placed before the CRS include statement, where we also reserved a space for this type of exclusion rule:
# === ModSec CRS: Runtime Exclusion Rules (ids: 10000-49999)

# ModSec Exclusion Rule: 920300 Request Missing an Accept Header
SecRule REQUEST_FILENAME "@streq /index.html" \
    "phase:1,nolog,pass,id:10000,ctl:ruleRemoveById=920300"
Now this is harder to read. Watch out for the ctl statement: ctl:ruleRemoveById=920300. This is the control action, which is used for runtime changes of the configuration of the ModSecurity rule engine. We use ruleRemoveById as the control statement and apply it to rule ID 920300. This block is placed within a standard SecRule directive. This allows us to use the complete power of SecRule to exclude rule 920300 in very specific situations. Here we exclude it based on the path of the request, but we could apply it depending on the agent’s IP address – or a combination of the two in a chained rule statement.
As with the startup rule exclusions, we are not limited to an exclusion by rule ID. Exclusions by tag will work just as well (ctl:ruleRemoveByTag). Again, regular expressions are supported, but only to a certain extent.
Startup time rule exclusions and runtime rule exclusions have the same effect, but internally, they are really different. With the runtime exclusions, you gain granular control at the cost of performance, as the exclusion is being evaluated for every single request. Startup time exclusions are performing faster and they are easier to read and write.
Step 8: Handling false positives: Disabling individual rules for specific parameters
Next we look at excluding an individual parameter from being evaluated by a specific rule. So unlike our example 920300, which looked at the specific Accept-header, we are now targeting rules examining the ARGS group of variables.
Let’s assume we have a password field in an authentication scheme like we used in the previous tutorial. Users are advised to use hard to guess passwords with lots of special characters which leads to the CRS sending a steady stream of alerts because of the strange passwords in this parameter field.
Here is an artificial example triggering the rule 942100, which leverages the libinjection library to detect SQL injections. Execute this command and you get an alert:
$> curl --data "password=' or f7x=gZs" localhost/login/login.doThere is nothing wrong with this password from a security perspective other than being a bit shot. In fact, we could just disable this rule. But it would be wrong to disable this rule completely. It serves a very important purpose with many other parameters, just not with the password. Ideally, we want to exclude the parameter password from being examined by this rule. Here is the startup time rule exclusion performing this task:
# ModSec Exclusion Rule: 942100 SQL Injection Attack Detected via libinjection
SecRuleUpdateTargetById 942100 !ARGS:password
This directive adds “not ARGS:password” to the list of parameters to be examined by rule 942100. This effectively excludes the parameter from the evaluation. This directive also accepts rule ranges as parameters. Of course, this directive also exists in a variant where we select the rule via its tag:
# ModSec Exclusion Rule: 942100 SQL Injection Attack Detected via libinjection
SecRuleUpdateTargetByTag "attack-sqli" !ARGS:password
The tag we are using in this example, attack-sqli, points to a wide range of SQL injection rules. So it will prevent a whole class of rules from looking at the password parameter. This makes sense for this password parameter, but it might go too far for other parameters. So it really depends on the application and the parameter in question.
A password parameter is generally only used on the login request, so we can work with the SecRuleUpdateTargetById directive in practice, so that all occurrences of said parameter are exempt from examination by rule 942100. But let me stress, that this directive is server-wide. If you have multiple services with multiple Apache virtual hosts each running a different application, then SecRuleUpdateTargetById and SecRuleUpdateTargetByTag will disable the said rule or rules respectively for all occurrences of the password parameter on the whole server.
So let’s assume you want to exclude password only under certain conditions. For example the rule should still be active when a security scanner is submitting the request. One fairly good way to detect scanners is by looking at the Referer request header. So the idea is to check for the correct header and then exclude the parameter from examination by 942100. This runtime rule exclusion works with a control action, similar to the ones we have seen before:
SecRule REQUEST_HEADERS:Referer "@streq https://localhost/login/displayLogin.do" \
    "phase:1,nolog,pass,id:10000,ctl:ruleRemoveTargetById=942100;ARGS:password"
The format of the control action is really difficult to grasp now: In addition to the rule ID, we add a semicolon and then the password parameter as part of the ARGS group of variables. In ModSecurity, this is called the ARGS collection with the colon as separator. Try to memorize this!
In professional use, this is likely the exclusion rule construct that is used the most (not with the Referer header, though, but with the REQUEST_FILENAME variable as shown above). This exclusion construct is very granular on the parameter level and it can be constructed to have only minimal impact on the requests thanks to the power of SecRule. If you would rather go with a tag than with an ID, here is your example:
SecRule REQUEST_HEADERS:Referer "@streq http://localhost/login/displayLogin.do" \
    "phase:1,nolog,pass,id:10000,ctl:ruleRemoveTargetByTag=attack-sqli;ARGS:password"
This section was very important. Therefore, to summarize once again: We define a rule to suppress another rule. We use a pattern for this which lets us define a path as a condition. This enables us to disable rules for individual parts of an application but only in places where false alarms occur. And at the same time, it prevents us from disabling rules on the entire server.
With this, we have seen all basic methods to handle false positives via rule exclusions. You now use the patterns for exclusion rules described above to work through the various false positives.
Looking ahead at the next tutorial we will be using a custom script to write these rule exclusions, since writing them by hand is very hard to get right.
Step 9: Readjusting the anomaly threshold
Handling false positives is tedious at times. However, with the goal of protecting the application, it is most certainly worthwhile. When we introduced the statistic script I stated that we should make sure that at least 99.999% of requests pass through the rule set without any false positives. The remaining positives, the ones caused by attackers, should be blocked. But we are still running with an anomaly limit of 10,000. We need to reduce this to a decent level. Any limit above 30 or 40 is unlikely to stop anything serious. With a threshold of 20, you start to see an effect and then with 10 you get fairly good protection from standard attackers. Even if an individual rule only scores 5 points, some attack classes like SQL injections typically trigger multiple alarms, so a limit of 10 catches quite a few attack requests. In other categories, the coverage with rules is less extensive. This means, the accumulation of multiple rules is rare. So it is perfectly possible to stay beneath a score of 10 with a certain attack payload. That’s why only a limit of 5 for the inbound score and 4 for the outbound score gives you a good level security. These are the default values of the CRS.
But how to lower the limit from 10,000 to 5 without harming production? It takes a certain trust in your tuning skills to perform this step. A more natural approach is to go over multiple iterations: An initial tuning round is performed with a limit of 10,000. When the most blatant sources of false positives are eliminated this way, you wait for a given amount of time and then lower the limit to 50 and examine the logs again. Tune and reduce to 30, then 20, 10 and finally 5. After every reduction, you need to check the new log files and run the statistic script. By looking at the statistics, you see what you can expect from a reduction of the limit. Let’s look once more at the stats we examined before:
$> cat tutorial-5/tutorial-5-example-access.log | alscores | modsec-positive-stats.rb
INCOMING                     Num of req. | % of req. |  Sum of % | Missing %
Number of incoming req. (total) |  10000 | 100.0000% | 100.0000% |   0.0000%

Empty or miss. incoming score   |      0 |   0.0000% |   0.0000% | 100.0000%
Reqs with incoming score of   0 |   9931 |  99.3100% |  99.3100% |   0.6900%
Reqs with incoming score of   1 |      0 |   0.0000% |  99.3100% |   0.6900%
Reqs with incoming score of   2 |      6 |   0.0600% |  99.3700% |   0.6300%
Reqs with incoming score of   3 |      5 |   0.0500% |  99.4200% |   0.5800%
Reqs with incoming score of   4 |      0 |   0.0000% |  99.4200% |   0.5800%
Reqs with incoming score of   5 |     55 |   0.5499% |  99.9700% |   0.0300%
Reqs with incoming score of   6 |      0 |   0.0000% |  99.9700% |   0.0300%
Reqs with incoming score of   7 |      0 |   0.0000% |  99.9700% |   0.0300%
Reqs with incoming score of   8 |      0 |   0.0000% |  99.9700% |   0.0300%
Reqs with incoming score of   9 |      0 |   0.0000% |  99.9700% |   0.0300%
Reqs with incoming score of  10 |      3 |   0.0300% | 100.0000% |   0.0000%

Incoming average:   0.0332    Median   0.0000    Standard deviation   0.4163


OUTGOING                     Num of req. | % of req. |  Sum of % | Missing %
Number of outgoing req. (total) |  10000 | 100.0000% | 100.0000% |   0.0000%

Empty or miss. outgoing score   |      0 |   0.0000% |   0.0000% | 100.0000%
Reqs with outgoing score of   0 |  10000 | 100.0000% | 100.0000% |   0.0000%

Outgoing average:   0.0000    Median   0.0000    Standard deviation   0.0000
10,000 requests is not really a big log file, but it will do for our purposes. Based on the data, we can immediately decide to reduce the limit to 50. It is unlikely that a request will hit that threshold – and if it does, it is going to be an isolated transaction which is very rare.
Reducing the limit to 5 would be a bit overzealous, because the column on the right states that 0.03% of the requests scored higher than 5. We should get rid of the 3 false positives at 10 before we should reduce the limit to 5.
With this statistical data, the iterative tuning process becomes quite clear: The modsec-positive-stats.rb script brings sense and reason to the process.
For the outbound responses, the situation is a bit simpler as you will hardly see any scores above 5. There simply are not enough rules to have any cumulative effect; probably because there is not much you can check in a response. So, I reduce the response threshold down to 5 or 4 rather quickly (which happens to be the default value of the CRS outbound request threshold).
I think the tuning concept and the theory are now quite clear. In the next tutorial, we will continue with tuning false positives to gain some practice with the methods demonstrated here. As mentioned in the previous step, I will also introduce a script which helps with the construction of the more complicated exclusion rules.
Step 10 (Goodie): Summary of the ways of combating false positives
It is possibly best to summarize the four tuning methods in a graphic. So here is a cheatsheet for your use!
References
License / Copying / Further use

This work is licensed under a Creative Commons Attribution-NonCommercial-ShareAlike 4.0 International License.
Changelog
- 2026-01-26: Updated CRS 3.3.7 to version CRS 4.22.0
- 2024-11-08: Updated CRS version from 3.3.5 to 3.3.7
- 2024-01-13: Updated CRS version from 3.3.4 to 3.3.5
- 2023-03-10: Add SecRequestBodyJsonDepthLimit directive
- 2022-11-25: Removed unnecessary sudo from ln comand in step 1
- 2022-11-17: Update log example in step 4 to extended-2019 logformat
- 2022-11-14: Updated CRS version from 3.3.2 to 3.3.4
- 2022-09-06: Updated CRS version from 3.3.0 to 3.3.2
- 2019-07-22: Moved CRS repo to new github at https://github.com/coreruleset/coreruleset
- 2019-11-04: Added env=HTTPS condition to STS header config
- 2019-11-01: Consistent naming of CRS in config comments
- 2019-10-31: Disabling TLSv1 and TLSv1.1
- 2019-04-03: Raise initial anomaly threshold to 10,000.
- 2019-03-21: Upgrade CRS 3.0.2 -> 3.1.0
- 2018-04-13: Update title format (markdown); rewordings (Simon Studer)
- 2017-12-17: Renumbered 200004->200005
- 2017-07-26: Upgrade CRS 3.0.0 -> 3.0.2
- 2017-03-05: MaxClients -> MaxRequestWorkers; changed order of ModSec tmp data folders
- 2017-02-25: Getting rid of AllowOverride completely, mentioning ruby package
- 2017-02-16: Reformatting
- 2017-02-15: Typos pointed out by Osama Elnaggar
- 2016-12-28: Removing single quotes from id actions in ModSec rules, fixing broken link
- 2016-11-14: Fixing links to previous tutorials
- 2016-11-02: CRS 3.0.0-rc2 -> CRS 3.0.0-rc3, fixed broken link to stats script
- 2016-11-01: Adding Cheatsheet. Publication.
- 2016-10-31: Feedback by Walter Hop
- 2016-10-31: Feedback by Manuel Leos Rivas
- 2016-10-10: Fixing small issues
- 2016-07-15: Apache 2.4.20 -> 2.4.23
- 2016-07-15: Apache 2.4.20 -> 2.4.23
- 2016-04-18: Fixing small issues
- 2016-03-10: Translated to English