
Efficiently configuring and debugging Apache and ModSec in the shell
What are we doing?
We are setting up shell tools and a method enabling us to efficiently edit Apache configurations and test them in just a few seconds without using a browser or having to constantly search through files by hand.
Why are we doing this?
Successfully configuring the Apache web server requires a lot of know-how and experience. When ModSecurity is added and intervenes in processing this make configuration even more complicated. That’s why it’s necessary to set up the right tools and a systematic workflow. This is the objective of this tutorial.
The tutorial is a bit pedantic, since it takes optimizing individual key presses in all seriousness. Since dozens, if not hundreds of actions have to be initiated in sequence in the configuration of a web server, there is plenty of room for optimizing the workflow, as ridiculous as it may seem. The advantage of this is that we can remove unnecessary ballast, clearing the view to the actual configuration problem. To this end this tutorial will be presenting some tricks and ideas that promise to be of benefit.
Requirements
- An Apache web server, ideally one created using the file structure shown in Tutorial 1 (Compiling an Apache web server).
- Understanding of the minimal configuration in Tutorial 2 (Configuring a minimal Apache server).
- An Apache web server with SSL/TLS support as in Tutorial 4 (Configuring an SSL server)
- An Apache web server with extended access log as in Tutorial 5 (Extending and analyzing the access log)
- An Apache web server with ModSecurity as in Tutorial 6 (Embedding ModSecurity)
- An Apache web server with a Core Rule Set installation as in Tutorial 7 (Embedding Core Rules)
Step 1: Curl
Curl is the right tool for making HTTP requests. HTTP must of course first work in the browser or the application. But when debugging or configuring new features the browser normally proves to be very cumbersome. Cooking handling, the size of the window, automatically following redirects, etc. all contribute towards making work in the browser very time consuming. That’s why when you have identified a problem in the browser it’s better to reproduce it using curl, find the bug, fix it in the server configuration and finally, verify it in the browser.
We’ve used curl a number of different ways in the preceding tutorials. This puts us in a strong position. But adding one or two features to your toolbox is still worthwhile.
$> curl --cookie-jar /tmp/cookies.txt --cookie /tmp/cookies.txt --data "username=test"\
    --data "password=xxxxxxxx" http://localhost/login.action
...
$> curl http://localhost/login.html --next --cookie-jar /tmp/cookies.txt --cookie /tmp/cookies.txt\
    --data "username=test" --data "password=xxxxxxxx" http://localhost/login.action
...
The first example works with a cookie file, writes the cookies received and reads new requests from the cookies. In the second example, which works only with a relatively new version of curl, multiple requests are put together on a single line. What’s interesting is the --next option dividing the command line arguments. The parameters following --next apply only to the right. This means that the rules above initially made a GET request, and then followed with a POST request on the same TCP connection and afterwards stored the session cookie in the cookie jar.
Step 2: Single Apache configuration file
The Apache configuration used in this series of tutorials is intended for the lab. By this I mean a test environment in which you can quickly try out the configuration or perform debugging regardless of productive HTTP traffic. One essential feature of the Apache configuration being used was the method for accommodating the entire configuration (with the exception of the OWASP ModSecurity Core Rule Set) in one file. The advantage of this is that we are able to quickly find our way around in the file and get to specific passages via standard search commands. However, this principle is not only beneficial in a lab-like setting. Working this way is also useful in a production environment for eliminating most conflicts and redundancies. This however runs counter to the widespread trend towards modularization of the web server configuration into a variety of files and induces errors. Indeed, I have many times been confronted by setups that configured the VirtualHosts multiple times, set up conflicting access restrictions and whose administrators seemed surprised to learn that the directives configured were being overridden in other places. This is the reason why whenever possible I try to work on one configuration in a single file.
In any case, it’s important to have a clear structure and a stringent approach. It must be clear where each directive is included in the configuration. Marked out sections have to be sufficiently commented (without hiding the directive in a jungle of documentation as in the default Apache configuration). The example configuration in the preceding tutorials attempted to do just that.
In a lab-like setting, it is probably best to set up a template. For my own work I have come up with a configuration named httpd.conf_template. It’s a ready-to-go configuration including reverse proxy configuration, the core rules, the performance log supported by ModSecurity, etc. and is based on the configurations from the preceding tutorials. When I start working on a new problem, I duplicate this template file and then slightly adjust this configuration to bend it towards the right scenario.
$> cp httpd.conf_template httpd.conf_problem-of-the-day
$> vim httpd.conf_problem-of-the-day
Vim is perfectly suited for editing Apache configurations, but the editor does not play such a key role so long as it supports syntax highlighting, which in my opinion is an invaluable feature.
Step 3: Apachex
curl and a single Apache file provide us a good foundation for quickly customizing configurations and testing them just as fast. This usually involves a somewhat annoying step between these often repeated steps: restarting the web server. In the first two tutorials we started the sever each time using the -X command line flag. I often work with -X, because it does not put the server into daemon mode and instead allows it to run as a single process in the foreground. Any server crash shows up immediately in the shell. If we start the web server as usual and run it as a daemon, we then have to watch the error log and make sure that we don’t miss a crash, which can involve all kinds of strange effects. Although it’s possible to monitor for crashes this way, in my experience it is a surprisingly serious drawback. So I work with -X.
The normal procedure for working with a single process Apache is to alternate starting the binary with the configuration file configured above and stopping it via CTRL-C. This is accompanied by two more disadvantages: First, we have to enter the name of the configuration file, or access it from the shell history starting from the second iteration. What’s even less pleasant is the loss of semaphores caused by using CTRL-C to quit the web server. Semaphores are a Linux operating system communication structure used by the web server. The number of semaphores is finite and when we quit the web server, it often fails to release a reserved semaphore. Eventually, the supply of semaphores is exhausted and the server can longer be started. It will instead issue the following error message, which can easily be attributed to the semaphore problem:
[emerg] (28)No space left on device: Couldn't create accept lockThe problem is not the lack of space, but the lack of free semaphores. They have to be recovered before a restart. The following construction has proven useful:
$> sudo ipcs -s | grep www-data | awk '{ print $2 }' | xargs -n 1 sudo ipcrm semWe use ipcs -s to read a list of semaphores, select the right lines via the web server’s user name and then use awk to select the second column of the output. We extract the ID of the semaphore, which when then use xargs and ipcrm sem to delete.
This is how to get a handle on this problem, the error message is still a nuisance, but repeatedly having to go back through the history to keep from having to re-type the name of the configuration file is no longer necessary. It’s better to have both done by a script: apachex. This script is available online (apachex).
$>
./bin/apachex -h

./bin/apachex

Script to launch apache repeatedly via httpd -X.

The script guesses the desired apache config and handles
 - sudo
 - pidfile
 - semaphore cleanup
The script first attempts to identify the most recently edited local Apache configuration file. This is very likely to be the configuration we want to test. If the assumption made is incorrect, it may be necessary to exit the script and touch the file you want. The script is aware of the different locations for configuration files and selects one file each time. It derives the httpd binary from this file. It then uses this information to start a loop. Then in the loop any web server process running is stopped, the semaphores are retrieved and the server restarted, with the help of sudo if necessary. The script uses the configuration file identified at the beginning. We send the single process Apache to the background, but keep it running in the current shell. It is thus not yet running as a separate daemon in the background, but will continue outputting it’s information to our shell. We will then continue to be informed if the process crashes.
Now, before we can start a new iteration of the loop, we pause for a bit and give the user the option of exiting the script either via the q key or initiating another iteration of the loop via the Enter key.
The script thus provides threefold functionality: * It identifies the Apache configuration file we want to test. * It stops and starts a web server process at the press of a key * In ensures that the supply of semaphores is not exhausted
In summary: One press of the Enter key and Apache will be restarted using the most recently edited configuration:
$> apachex

Launching apache on config file /apache/conf/httpd.conf_problem-of-the-day ... ok

Press [enter] to restart apache, enter [q] to stop apache and exit:

Stopping active apache process ... ok
Launching apache on config file /apache/conf/httpd.conf_problem-of-the-day ... ok

Press [enter] to restart apache, enter [q] to stop apache and exit: q

Bailing out ... ok
Step 4: lastrequestsummary
We still lack intelligent access to the log files. curl -v does provide us feedback about the results of a request, but with ModSecurity rules it’s important to be able to follow processing on the server side. And with its chatty and unclear log file entries, ModSecurity poses a challenge, especially since a single request can quickly generate more logging that can fit in a window and most of this information is of no interest. What we are missing is a summary of a request including information from both the access log and the error log. The lastrequestsummary adds just such an analysis (lastrequestsummary):
$> cat lastrequestsummary

#!/bin/bash
#
# Script that extracts information from the latest request in the access
# log and enriches this with info from the error-log.
#
# Script is meant to be called regularly via watch.
#

ACCESSLOG="$1"
ERRORLOG="$2"

ACCESS_IGNORE_REGEX="(heartbeat)"

if [ -z "$ACCESSLOG" ]; then
        echo "Accesslog not passed via commandline. Please pass path to accesslog as first parameter. \
This is fatal. Aborting."
        exit 1
fi
if [ ! -f "$ACCESSLOG" ]; then
        echo "Accesslog $ACCESSLOG not found. This is fatal. Aborting."
        exit 1
fi
if [ -z "$ERRORLOG" ]; then
        echo "Errorlog not passed via commandline. Please pass path to errorlog as first parameter.\
This is fatal. Aborting."
        exit 1
fi
if [ ! -f "$ERRORLOG" ]; then
        echo "Errorlog $ERRORLOG not found. This is fatal. Aborting."
        exit 1
fi

ACCESSLINE=$(tail -200 $ACCESSLOG | grep -E -v "$ACCESS_IGNORE_REGEX" | tail -1)
ID=$(echo "$ACCESSLINE" | egrep -o " [a-zA-Z0-9@-]{24} " | tr -d " ")
METHOD_PATH=$(echo "$ACCESSLINE" | cut -d\  -f6,7 | cut -b2-)
STATUS=$(echo "$ACCESSLINE" | cut -d\  -f9)
SCORES=$(echo "$ACCESSLINE" | egrep -o "[0-9-]+ [0-9-]+$")
TIME=$(echo "$ACCESSLINE" | cut -d\  -f5 | cut -d. -f1)


echo "$(date +"%H:%M:%S") watching: $ACCESSLOG  $ERRORLOG"
echo
echo "$TIME $STATUS $SCORES $METHOD_PATH ($ID)"
echo

echo "ModSecurity Rules Triggered:"
MODSEC=$(tail -500 $ERRORLOG | grep $ID | grep -o -E " (at|against) .*\[file.*\[id \"[0-9]+.*\
\[msg \"[^\"]+" | tr -d \" | sed -e "s/ at the end of input at/ at/" -e "s/ required. /. /" \
-e "s/\[rev .*\[msg/[msg/" -e "s/\. / /" -e "s/(Total .*/(Total ...) .../" | tr -d \] | \
cut -d\  -f3,9,11- |
sed -e "s/^\([^ ]*\) \([^ ]*\)/\2 \1/" | awk "{ printf \"%+6s %-35s %s %s %s %s %s %s %s %s %s \
%s %s %s %s %s %s %s %s %s\n\", \$1, \$2, \$3, \$4, \$5, \$6, \$7, \$8, \$9, \$10, \$11, \$12, \
\$13, \$14, \$15, \$16, \$17, \$18, \$19, \$20 }" | sed -e "s/\ *$//")
# This is a crazy one-liner. A description starting with "grep -o -E":
# We grep for the various ModSec alert messages and take the content from the
# at/against via the parameter name, the id up and including the message. tr
# and sed and again tr are then used to strip this down. Now cut is used to
# extract (1) the parameter, (2) the id and (3) the message. Then we use sed
# to swap the position of the parameter and the id. Then we used awk to print
# the three fields in a clean table. This demands the used of a lot of %s
# fields, which results in a lot of empty spaces at the end of the line, which
# are finally removed.
if [ -z "$MODSEC" ]; then
        MODSEC="***NONE***"
fi
echo "$MODSEC"
echo

echo "Apache Error Log:"
ERRORLINES=$(tail -500 $ERRORLOG | grep $ID | grep -v -E "ModSecurity.*\b(at|against)\b")
if [ -z "$ERRORLINES" ]; then
        ERRORLOG="***NONE***"
fi
echo "$ERRORLINES"
echo

echo "Full Apache Access Log:"
echo "$ACCESSLINE"
The script is not a very elegant implementation of the idea. In fact, it has somewhat of a brute character, but it also has the advantage that output can be easily changed. Which is highly recommended here, because the script is only an example of what has worked for me. Let’s take a quick look at the script. It expects a request using the two log files as parameters $1 and $2. The last request is determined on this basis, whereas heartbeat requests (uninteresting requests from a monitoring service, for example) are ignored. The unique request ID is extracted from the request. Then the method, path, status, ModSecurity scores are extracted. This information is then output.
Next comes a summary of ModSecurity messages related to the request. The very non-transparent construction is oriented towards melsummary introduced earlier, that is used in all of its complexity here. Last, but not least, the script prints the messages from the error log that were not ModSecurity alerts.
Typical output from the script looks like this:
$> lastrequestsummary /apache/logs/access.log /apache/logs/error.log
07:53:20 watching: /apache/logs/access.log  /apache/logs/error.log

07:53:14 200 2 0 GET /index.html?a=..... (VqkfSH8AAQEAAHjqe40AAAAC)

ModSecurity Rules Triggered:
981172 ARGS:a                                           Restricted SQL Character Anomaly Detection Alert - …

Apache Error Log:
[2016-01-27 07:53:14.334862] [authz_core:debug] 127.0.0.1:36837 VqkfSH8AAQEAAHjqe40AAAAC AH01626: …
authorization result of Require all granted: granted
[2016-01-27 07:53:14.334899] [authz_core:debug] 127.0.0.1:36837 VqkfSH8AAQEAAHjqe40AAAAC AH01626: …
authorization result of <RequireAll>: granted
[2016-01-27 07:53:14.334914] [authz_core:debug] 127.0.0.1:36837 VqkfSH8AAQEAAHjqe40AAAAC AH01626: …
authorization result of <RequireAny>: granted

Full Apache Access Log:
127.0.0.1 - - [2016-01-27 07:53:14.333396] "GET /index.html?a=..... HTTP/1.1" 200 45 "-" "curl/7.35.0" …
localhost 127.0.0.1 80 - - + "-" VqkfSH8AAQEAAHjqe40AAAAC - - 125 256 -% 4294 560 130 250 2 0
On the third line we see the timestamp of the request, the HTTP status, the ModSecurity core rules incoming anomaly score, the outgoing anomaly score, method, path and finally in brackets, the unique request ID. The other lines are self-explanatory and are simply an illustration of what can be done with such a script.
The trick is using watch to regularly call this script at short intervals. A separate shortcut script named watch-lastrequestsummary can be used for this (watch-lastrequestsummary):
$>cat watch-lastrequestsummary
#!/bin/bash
#
# Watch lastrequestsummary every second
#
# Adopt filenames as see fit

watch --interval 1 --no-title "lastrequestsummary /apache/logs/access.log /apache/logs/error.log"
Particularly for production use, it is also advisable to adjust the file names here, or to have an intelligent search process set them automatically.
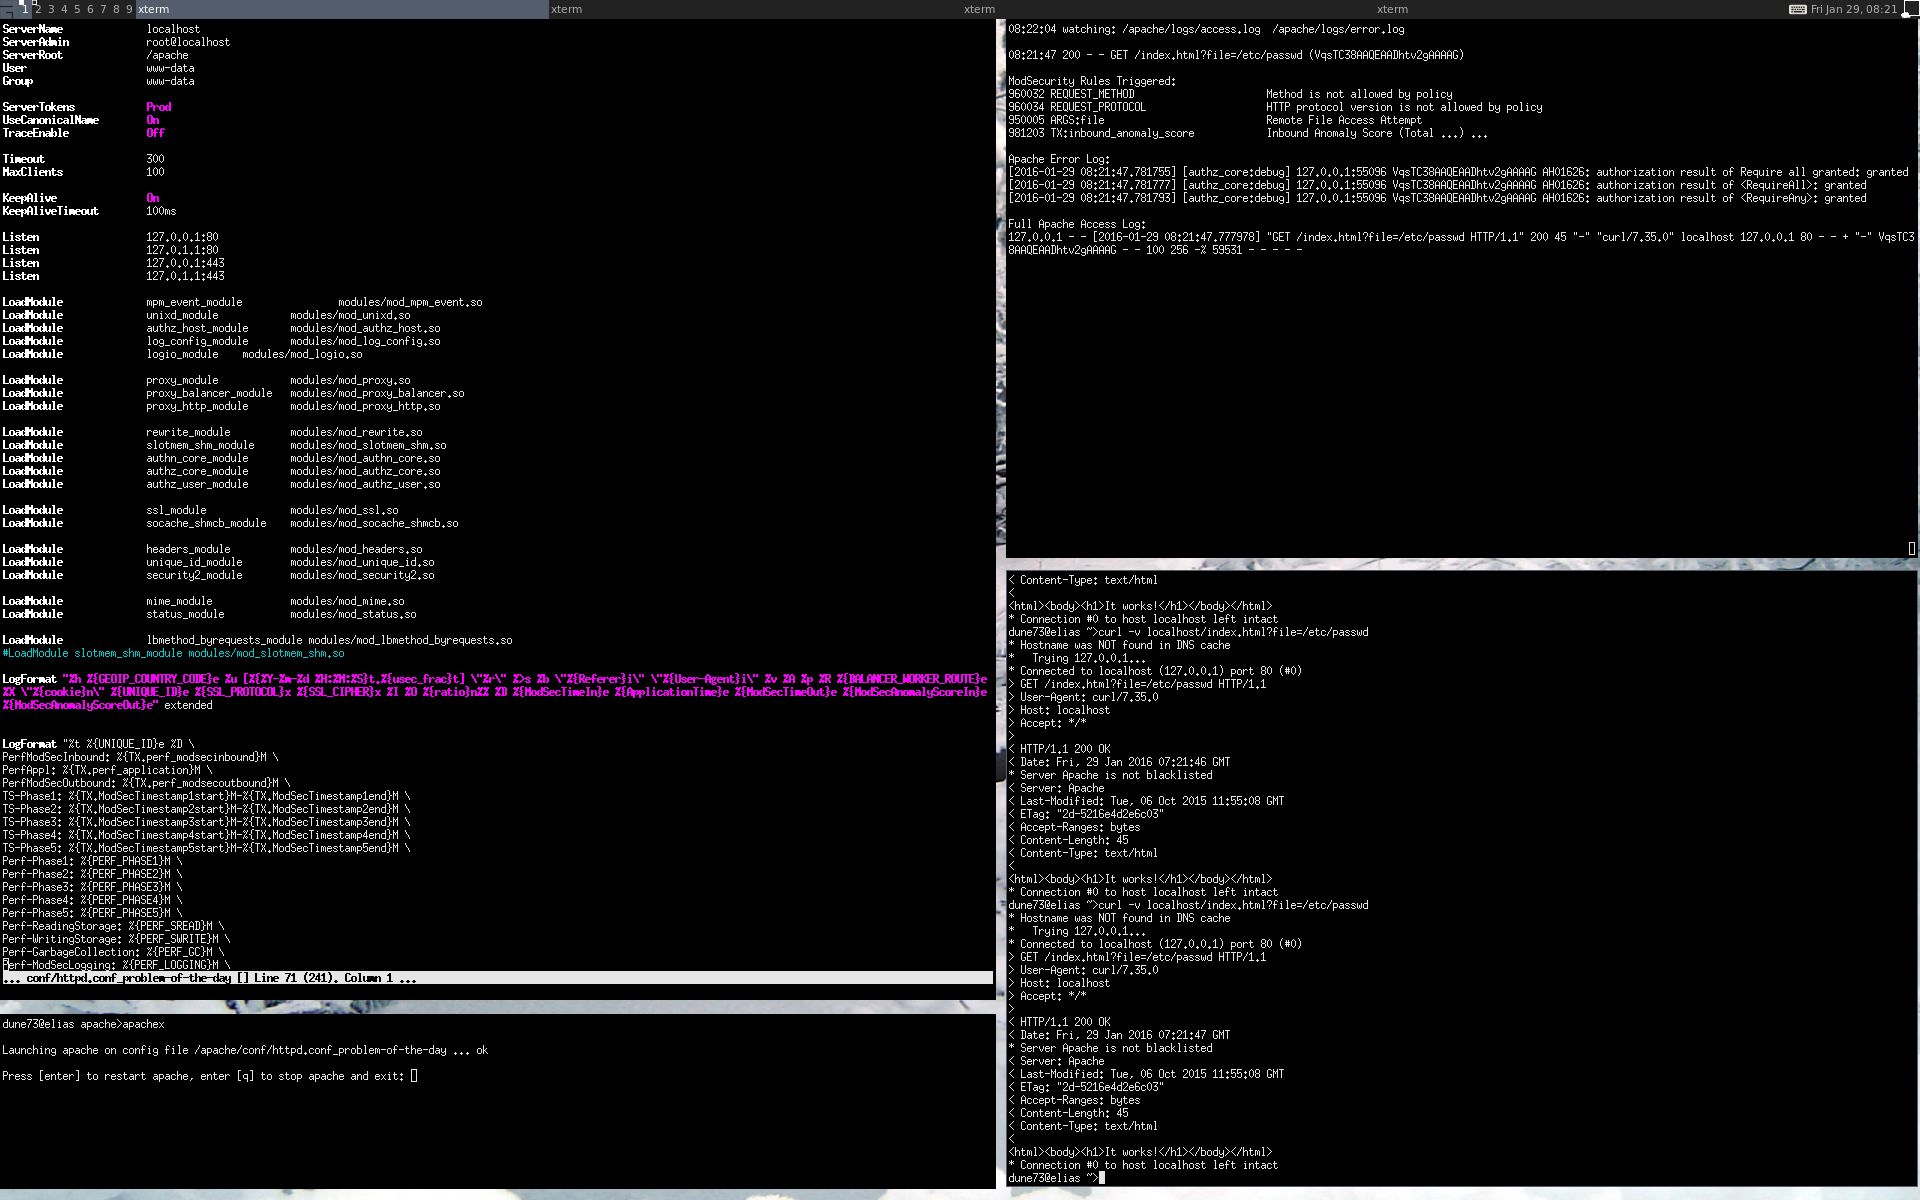
Step 5: Dividing the screen into 4 sections
In the preceding four steps we have seen how to configure Apache, easily start it, talk to it as efficiently as possible and finally, to check its behavior in the log files. It’s time to assign each of these steps to its own shell window. This brings us to a classic four-window setup which has proven to be very efficient in practice. Provided enough screen space is available, there’s nothing against trying a 6 or 9-window setup, unless you’d lose track of things by doing so.
For me a 4-window setup has proven useful and I recommend using one while working on the Apache web server. I use a tiling window manager, but this is of course not required to set up this layout. The only thing that is important is arranging the windows in the right sequence for the workflow. By doing so, my eyes follow a circle in counterclockwise direction:
- Apache configuration (top left, window extended vertically)
- apachex (bottom left, window shortened vertically)
- curl (bottom right)
- watch melsummary (top right)
The procedure goes as follows: The configuration is modified at the top left and pressing the Enter key restarts it at the bottom left. The desired curl request talks to the web server at the bottom right and with no additional interaction via the keyboard the content of the log files are output automatically above it and visually inspected. Then comes the next step in the configuration, restart, curl, inspect the log files … then back to configuration, restart, curl, inspect the log files, etc.
This cyclical workflow is kept very lean. It enables me to go through one to three customization cycles per minute. This is how I create a new configuration step-by-step. The lean process also enables the development of very complicated ModSecurity formulas without getting lost along the way, because you can get caught up in editing the configuration or reading the log files when using lots of different parameters to call curl.
Here’s a screenshot of my desktop:
References
License / Copying / Further use

This work is licensed under a Creative Commons Attribution-NonCommercial-ShareAlike 4.0 International License.
Changelog
- 2018-04-13: Update title format (markdown); rewordings (Simon Studer)
- 2017-12-17: Fixed several links
- 2017-02-16: Reformatting
- 2016-10-10: Fixing small issues
- 2016-07-15: Apache 2.4.20 -> 2.4.23
- 2016-07-15: Apache 2.4.20 -> 2.4.23
- 2016-04-18: Fixing small issues
- 2016-03-10: Translated to English