
Enabling Encryption with SSL/TLS
What are we doing?
We are setting up an Apache web server secured by a server certificate.
Why are we doing this?
The HTTP protocol uses plain text, which can easily be spied on. The HTTPS extension surrounds HTTP traffic in a protective SSL/TLS layer, preventing snooping and ensuring that we are really talking to the server we entered in the URL. All data is sent encrypted. This still doesn’t mean that the web server is secure, but it is the basis for secure HTTP traffic.
Requirements
- An Apache web server, ideally one created using the file structure shown in Tutorial 1 (Compiling an Apache web server).
- Understanding of the minimal configuration in Tutorial 2 (Configuring a minimal Apache server).
First, we are going to enable the server to use SSL with a self-signed certificate. Afterwards, I will explain how to get an officially signed certificate. In order to perform this step, you need to control a domain and a webserver, which is being routed and thus accessible from the internet. In this tutorial, I am going to work with the example domain christian-folini.ch.
This whole series of tutorials is meant as a guide to a successful lab setup. The idea is to really, really understand Apache. This tutorial is a bit of an exception, as we need to be accessible from the internet in order to get the signed certificate. Later tutorials will return to the lab setup though.
Step 1: Configuring a server using SSL/TLS, but without an officially signed certificate
The inner working of the SSL-/TLS-protocol is complex. The free OpenSSL Cookbook by Ivan Ristić (see links below) explains this topic. His bigger work Bulletproof SSL and TLS, which explains the trust relationships in great detail, is another good introduction. The minimal knowledge required can be found in this tutorial though.
When contacted by a client, an SSL server must use a signed certificate to identify itself. For a successful connection, the client must be familiar with the signing authority, which it does by checking the certificate chain from the server to the root certificate of the signing authority, also called the certificate authority. Officially signed certificates are acquired from a public (or private) provider whose root certificate is one the browser is familiar with.
The configuration of an SSL server therefore comprises of two steps: Obtaining an officially signed certificate and configuring the server. The configuration of the server is the more interesting and easier part, which is why we’ll do that first. In doing so, we’ll be using an unofficial certificate present on our system (at least if it’s from the Debian family and the ssl-cert package is installed).
The certificate and related key are located here:
/etc/ssl/certs/ssl-cert-snakeoil.pem
/etc/ssl/private/ssl-cert-snakeoil.key
The names of the files are an indication that this pair is one that shouldn’t inspire confidence. The browser will then put up a warning about the certificate if it’s being used for a server.
But they are perfectly fine for an initial attempt at configuration:
ServerName              localhost
ServerAdmin             root@localhost
ServerRoot              /apache
User                    www-data
Group                   www-data

ServerTokens            Prod
UseCanonicalName        On
TraceEnable             Off

Timeout                 10
MaxRequestWorkers       100

Listen                  127.0.0.1:80
Listen                  127.0.0.1:443

LoadModule              mpm_event_module        modules/mod_mpm_event.so
LoadModule              unixd_module            modules/mod_unixd.so

LoadModule              log_config_module       modules/mod_log_config.so

LoadModule              authn_core_module       modules/mod_authn_core.so
LoadModule              authz_core_module       modules/mod_authz_core.so

LoadModule              ssl_module              modules/mod_ssl.so
LoadModule              headers_module          modules/mod_headers.so

ErrorLogFormat          "[%{cu}t] [%-m:%-l] %-a %-L %M"
LogFormat               "%h %l %u [%{%Y-%m-%d %H:%M:%S}t.%{usec_frac}t] \"%r\" %>s %b \
\"%{Referer}i\" \"%{User-Agent}i\"" combined

LogLevel                debug
ErrorLog                logs/error.log
CustomLog               logs/access.log combined

SSLCertificateKeyFile   /etc/ssl/private/ssl-cert-snakeoil.key
SSLCertificateFile      /etc/ssl/certs/ssl-cert-snakeoil.pem

SSLProtocol             All -SSLv2 -SSLv3 -TLSv1 -TLSv1.1
SSLCipherSuite          'kEECDH+ECDSA kEECDH kEDH HIGH +SHA !aNULL !eNULL !LOW !MEDIUM \
!MD5 !EXP !DSS !PSK !SRP !kECDH !CAMELLIA !RC4'
SSLHonorCipherOrder     On

SSLRandomSeed           startup file:/dev/urandom 2048
SSLRandomSeed           connect builtin

DocumentRoot            /apache/htdocs

<Directory />

        Require all denied

        Options SymLinksIfOwnerMatch

</Directory>

<VirtualHost 127.0.0.1:80>

      <Directory /apache/htdocs>

        Require all granted

        Options None

      </Directory>

</VirtualHost>

<VirtualHost 127.0.0.1:443>

        SSLEngine On

        Header always set Strict-Transport-Security "max-age=31536000; includeSubDomains" env=HTTPS

        <Directory /apache/htdocs>

            Require all granted

            Options None

        </Directory>

</VirtualHost>
I won’t be describing the entire configuration, only the directives that have been added since Tutorial 2. We are now listening on the port 80, but also on the HTTPS-port 443. As we have to be accessible from the internet in the subsequent steps, we are no longer limiting the server to listen only on the localhost address, but on all the configured IP addresses instead. This setup is also used with the VirtualHosts.
As expected, the SSL module is the new one to be loaded; and additionally the Headers-module, which we’ll use below. Then we configure the key and the certificate by using the SSLCertificateKeyFile and SSLCertificateFile directives. On the protocol line (SSLProtocol) it is very important for us to disable the older and insecure SSLv2, SSLv3, TLSv1 and TLSv1.1 protocols. This will result in only allowing the fairly modern TLSv1.2 and then the new TLSv1.3 protocol if it is available for your installation. TLSv1.2 is likely to be the dominant protocol for the time being. The handshake and encryption is done using a set of several algorithms. We use these cryptograph algorithms to define the cipher suite. It’s important to use a clean cipher suite, because this is where snooping attacks typically take place: They exploit the vulnerabilities and the insufficient key length of older algorithms. However, a very limited suite may prevent older browsers from accessing our server. The proposed cipher suite has a high level of security and also takes into account some older browsers starting with Windows Vista. We are thus excluding Windows XP and very old versions of Android from communication.
The HIGH group of algorithms is the core of the cipher suite. This is the group of high encryption ciphers which OpenSSL provides to us via the SSL module. The algorithms listed in front of this keyword, which are also a part of the HIGH group, are given higher priority by being listed first. Afterwards we add the SHA hashing algorithm and exclude a number of algorithms that for one reason or another are not wanted in our cipher suite.
When I talked about this definition of a cipher suite with Ivan Ristić, he made it clear he prefers to define the list by naming all the desired ciphers explicitly and in right order. So he will not use the keyword HIGH at all. My approach is different as it is based on the HIGH keyword with some manual tweaks on the cipher order by hand. The point with my approach is, that new ciphers appearing within the group HIGH will be added to the cipher list automatically. But this might not always be desired and also the order of the ciphers could be rearranged within the HIGH group. We depend on OpenSSL and on the operating system’s compiled OpenSSL in this regard. Ivan’s approach keeps total control, but you might miss out new strong ciphers when they become available unless you reconfigure the cipher list. So there is a tradeoff between convenience for the maintainer and control over the cipher suite.
After the cipher suite we follow with the SSLHonorCipherOrder directive. It is of immense importance. We often hear about downgrade attacks in SSL. This is when the attacker, a man-in-the-middle, attempts to inject himself into traffic and influence the parameters during the handshake in such a way that a less secure protocol is used. Specifically, the prioritization defined in the cipher suite is defeated. The SSLHonorCipherOrder directive prevents this type of attack by insisting on our server’s algorithm preference.
Encryption works with random numbers. The random number generator should be properly started and used, which is the purpose of the SSLRandomSeed directive. This is another place where performance and security have to be considered. When starting the server we access the operating system’s random numbers in /dev/urandom. While operating the server, we use Apache’s own source for random numbers (builtin), seeded from the server’s traffic for the SSL handshake. The /dev/urandom source is the best source for random numbers in almost all situations: it is a quick source and also one that guarantees a certain amount of entropy. The qualitatively even better source, /dev/random, could in adverse circumstances block our server when starting, because not enough entropy data is present. This is why /dev/urandom is generally preferred outside of very rare and special situations.
We have also introduced a second virtual host. It is very similar to the virtual host for port 80. But the port number is 443 and we are enabling the SSL engine, which encrypts traffic for us and first enables the configuration defined above. Additionally, we use the Header-Module loaded above in order to set the Strict-Transport-Security-header (short STS-Header). This HTTP header is part of the response and tells the client to use encryption for a duration of one year (this equals 31536000 seconds) when connected to our server. This happens regardless of the presence of the https string in links. So any attempt to lure the browser to talk to our server in cleartext will be rewritten to https. The flag includeSubDomains means, that all subdomains below our hostname are included in this instruction. Be careful here: Working with the domain christian-folini.ch, we will be calling the server with this naked hostname without the leading www. Setting the flag includeSubDomains on such a request effectively means, that every hostname within the christian-folini.ch domain will only be addressed via https in the future. If you continue to run other services on port 80 only, this is dangerous. The flag includeSubDomains should only be used if you are really sure all subdomains of your domain run on https and this policy is here to stay. Now there is also a condition at the end, that limits the header to encrypted connections. In fact it is possible to talk in cleartext to the encrypted port here. The server will respond with an error message and the condition will make sure this reponse does not contain said header.
The STS-header is the most prominent from a group of newer security related headers. Various browsers implement different headers, so it is not very easy to maintain an overview, but the STS-header should never be omitted. If we look at the Header directive in more detail, we see the additional flag always. There are cases where the module is not springing into action (for example when we return an error as a response) without this flag. With always, we make sure the header is always sent.
That’s all the changes to our configuration. Time to start the server!
Step 2: Trying it out
$> curl -v https://127.0.0.1/index.html
* Rebuilt URL to: https://127.0.0.1:443/
*   Trying 127.0.0.1...
* Connected to 127.0.0.1 (127.0.0.1) port 443 (#0)
* found 173 certificates in /etc/ssl/certs/ca-certificates.crt
* found 697 certificates in /etc/ssl/certs
* ALPN, offering http/1.1
* SSL connection using TLS1.2 / ECDHE_RSA_AES_256_GCM_SHA384
*        server certificate verification OK
*        server certificate status verification SKIPPED
* SSL: certificate subject name (ubuntu) does not match target host name '127.0.0.1'
* Closing connection 0
curl: (51) SSL: certificate subject name (ubuntu) does not match target host name '127.0.0.1'
Unfortunately, we were not successful. It’s no wonder, because we were talking to a server at IP address 127.0.0.1 and it replied to us with a certificate for myhost.home. This is a typical case of a handshake error.
We can instruct curl to ignore the error and open the connection nonetheless. This is done using the –insecure, or -k flag:
$> curl -v -k https://127.0.0.1/index.html
* Rebuilt URL to: https://127.0.0.1:443/
*   Trying 127.0.0.1...
* Connected to 127.0.0.1 (127.0.0.1) port 443 (#0)
* found 173 certificates in /etc/ssl/certs/ca-certificates.crt
* found 697 certificates in /etc/ssl/certs
* ALPN, offering http/1.1
* SSL connection using TLS1.2 / ECDHE_RSA_AES_256_GCM_SHA384
*        server certificate verification SKIPPED
*        server certificate status verification SKIPPED
*        common name: ubuntu (does not match '127.0.0.1')
*        server certificate expiration date OK
*        server certificate activation date OK
*        certificate public key: RSA
*        certificate version: #3
*        subject: CN=ubuntu
*        start date: Mon, 27 Feb 2017 20:46:21 GMT
*        expire date: Thu, 25 Feb 2027 20:46:21 GMT
*        issuer: CN=ubuntu
*        compression: NULL
* ALPN, server accepted to use http/1.1
> GET /index.html HTTP/1.1
> User-Agent: curl/7.35.0
> Host: 127.0.0.1
> Accept: */*
>
< HTTP/1.1 200 OK
< Date: Thu, 01 Oct 2015 07:48:13 GMT
* Server Apache is not blacklisted
< Server: Apache
< Strict-Transport-Security: max-age=31536000; includeSubDomains
< Last-Modified: Thu, 24 Sep 2015 11:54:56 GMT
< ETag: "2d-5207ce664322e"
< Accept-Ranges: bytes
< Content-Length: 45
<
<html><body><h1>It works!</h1></body></html>
* Connection #0 to host 127.0.0.1 left intact
It works now and our SSL server is running. Admittedly with a lazy certificate and we are still far from being able to use it in production.
Below we will be discussing how to obtain an official certificate, how to install it correctly and how to tweak our configuration a bit.
Step 3: Preparing to get an SSL key and certificate
HTTPS adds an SSL layer to the familiar HTTP protocol. Technically, SSL (Secure Socket Layer) has been replaced by TLS (Transport Security Layer), but people still refer to it as SSL. The protocol guarantees encryption and thus data traffic is secured from eavesdropping. Traffic is encrypted symmetrically, guaranteeing greater performance, but in the case of HTTPS requires a public/private key setup for the exchange of symmetric keys by previously unknown communication partners. This public/private key handshake is done by using a server certificate which must be signed by an official authority. The handshake is thus meant to extend browser’s trust in the signing authority to the webserver being contacted. This is being done with the help of a chain of trust over multiple certificates.
Server certificates exist in a variety of forms, validations and scopes of application. Not every feature is really of a technical nature and marketing also plays a role. The price differences are very large, which is why a comparison is worthwhile. For our test setup we’ll be using a free certificate that we will nonetheless have officially certified. This is being done with the help of Let’s Encrypt. This new certificate authority was born in 2015. It hands out official certificates for free and it has simplified the signing process in a very elegant way if you compare it to the traditional commercial certificate authorities.
Before Let’s Encrypt will give us a validated certificate for our server, the certificate authority has to be sure, we are really the owners of the domain for which we’ve requested a certificate. This is done as follows: We prove our control over the said domain by placing a security nonce, provided by Let’s Encrypt, on the webserver at a predefined location. We then tell Let’s Encrypt to come and check the nonce. It will thus make a request to our server and compare the contents of the test file with the nonce it gave us. If the two values are identical, then we have proven that we do in fact control the domain in question and Let’s Encrypt will accept us as the owner of said domain. This will be followed by signing a certificate for the domain in question on our behalf. We will then take this certificate and install it on the server.
There are multiple clients to work with Let’s Encrypt. My colleague Luca Käser has mentioned getssl which features simple command line use and maximum of control. It is also fit for production use, as it has the option to deploy the token file not only on the local host, but also on a remote server via ssh. This is an advantage if you have blocked the server from sending requests to the internet and the server is thus not allowed to call Let’s Encrypt itself.
But this is an advanced scenario. For a first try, we call Let’s Encrypt directly from the server. As a precondition, we need to get getssl ourselves. The tool is so new that it is not yet part of the official Linux distributions. We will download the script. In my case, I will put it in the private bin-folder. Depending on your setup, you may want to use an alternate location. It’s important that getssl can be found via the standard shell path from now on. We fetch the script from GitHub. There is the option to clone the whole project directory. But we will simplify things by downloading the raw script and making it executable.
$> wget https://raw.githubusercontent.com/srvrco/getssl/master/getssl -O $HOME/bin/getssl
...
$> chmod +x $HOME/bin/getssl
...
I will use christian-folini.ch as my example domain. This will show in the shell commands. Of course, all these commands need to be adapted to your own domain, if they are meant to work.
We will now create the base configuration for our domain.
$> getssl --create christian-folini.ch
...
This tells the script to create a file tree. These are the folders and files being created:
.getssl
.getssl/getssl.cfg
.getssl/christian-folini.ch
.getssl/christian-folini.ch/christian-folini.ch.crt
.getssl/christian-folini.ch/getssl.cfg
Before we can call for the creation of a certificate, it is important to edit the two getssl.cfg files a bit. First the base configuration in the file .getssl/getssl.cfg. In this file, you need to know that Let’s Encrypt runs a test certificate authority at the URL https://acme-staging.api.letsencrypt.org where you can check your setup – and then the real certificate authority which creates the official certificates. It is useful to create your setup with the test CA first and then, when the paths are correct and the validation has worked, enable the official CA at https://acme-v01.api.letsencrypt.org. In .getssl/getssl.cfg, the test CA is active by default. At the beginning, there is not really much to do; entering a correct address for ACCOUNT_EMAIL sounds good, though.
Let’s move on to the configuration file for the domain .getssl/christian-folini.ch/getssl.cfg. Here, we check the value for SANS. I suspect this means Subject Alternative NameS and defines additional host names – or in the CA language Subject-Names, which will be added to the certificate. In the case of the domain christian-folini.ch we expect SANS=www.christian-folini.ch, which really is a different hostname which needs to be declared separately. Most of the other values are commented out, which means that the values, defined in the main configuration file, will be inherited and we do not have to set them. An important value has to be set though: acl. For our tutorial, I am setting it as follows:
acl='/apache/htdocs/.well-known/acme-challenge'This defines the path of the token, that getssl will place in the file system in order to have it checked by Let’s Encrypt. In other words, the script will place the token in this location and tell the certificate authority to fetch the token via the webserver. If that works and the token is correct, we are confirmed as owners of the domain and we will get the valid certificate. The part of the acl path from .well-known on to the end corresponds with the Let’s Encrypt standard. Any other value is possible, though.
Outside of our domain name, we have entered an alternate name in the variable SANS. Let’s Encrypt will check both names and it will place an individual token for both names. We can handle this by entering the same path twice under acl, or we can enable the variable USE_SINGLE_ACL, which is much more elegant.
Step 4: Getting the SSL key and certificate
Let’s start our call to Let’s Encrypt:
$> getssl christian-folini.ch
archiving old certificate file to /home/dune73/.getssl/christian-folini.ch/christian-folini.ch. …
creating account key /home/folini/.getssl/account.key
Generating RSA private key, 4096 bit long modulus
..................................................++
............................................................++
e is 65537 (0x10001)
creating domain key - /home/folini/.getssl/christian-folini.ch/christian-folini.ch.key
Generating RSA private key, 4096 bit long modulus
..............++
...................................++
e is 65537 (0x10001)
creating domain csr - /home/folini/.getssl/christian-folini.ch/christian-folini.ch.csr
Registering account
Registered
Verify each domain
Verifing christian-folini.ch
copying challenge token to /apache/htdocs/.well-known/acme-challenge/xiM4FlHAqxo9fuAG-Ag-…
Pending
Verified christian-folini.ch
Verifing www.christian-folini.ch
copying challenge token to /apache/htdocs/.well-known/acme-challenge/QK4x1EyQ1Su7qZ-XTJL7…
Verified www.christian-folini.ch
Verification completed, obtaining certificate.
Certificate saved in /home/folini/.getssl/christian-folini.ch/christian-folini.ch.crt
The intermediate CA cert is in /home/folini/.getssl/christian-folini.ch/chain.crt
getssl: christian-folini.ch - certificate obtained but certificate on server is different …
from the new certificate
You can see how a new key was first created. Then the script created a Certificate Signing Request with the file ending csr and the test file /apache/htdocs/.well-known/acme-challenge/xiM4FlHAqxo9fuAG-Ag-BTV_DsUJAbegPoZ6-l_luSA. This was followed by the request to check the domain and sign the certificate. In the server’s access log, we will then see the following entry (the IP addresses of the validation server and the exact filename can vary):
66.133.109.36 US - [2016-10-02 06:26:40.635068] …
"GET /.well-known/acme-challenge/zg0bwpHNmRmFdXS4YeTgjBKiy84JoYDpu-cHON2mC9k HTTP/1.1" …
200 87 "-" "Mozilla/5.0 (compatible; Let's Encrypt validation server; +https://www.letsencrypt.org)"
If we check the output of the getssl command again, we see that the verification was performed twice. Also a certificate has been signed and was delivered. But still, there was something wrong, as on the last line, the script reports that the certificate on the server does not correspond to the one we have been given. That really is the case, because we do not yet have the new certificate installed on the server. In fact, the script is able to perform this in a single run (the special variables used for this feature will be explained further down below).
I have proposed to do a first test run with the test certificate authority of Let’s Encrypt. If the script runs smoothly, then you can enter the production certificate authority. The call remains the same and we will get an official certificate signed for public use, ready to be deployed on the server.
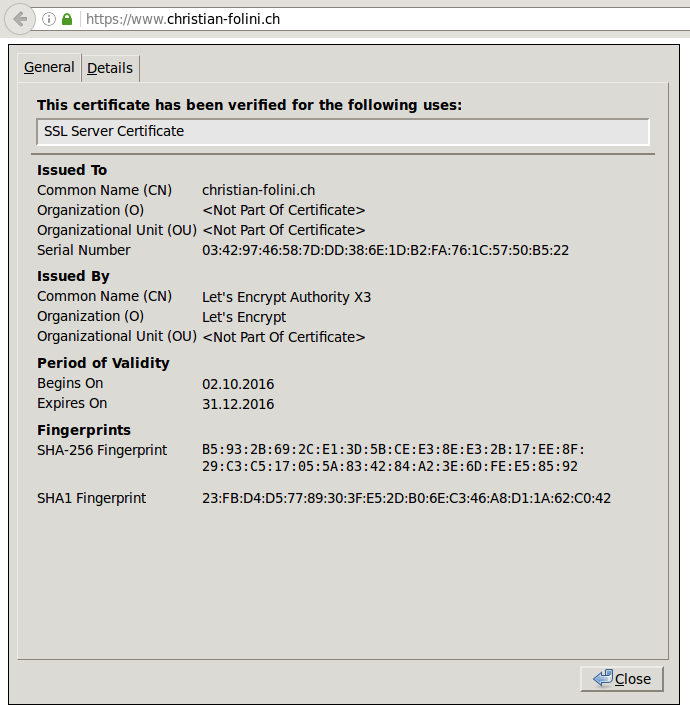
But let’s have a closer look at the certificate first. We will use the command line version of OpenSSL. We will watch out for he fields Validity with the period of application of the certificate (three months), the Signature Algorithm, the Public Key Algorithm and of course Subject together with Subject Alternative Name:
$> openssl x509 -text -in $HOME/.getssl/christian-folini.ch/christian-folini.ch.crt
Certificate:
    Data:
        Version: 3 (0x2)
        Serial Number:
            03:42:97:46:58:7d:dd:38:6e:1d:b2:fa:76:1c:57:50:b5:22
    Signature Algorithm: sha256WithRSAEncryption
        Issuer: C=US, O=Let's Encrypt, CN=Let's Encrypt Authority X3
        Validity
            Not Before: Oct  2 06:24:00 2016 GMT
            Not After : Dec 31 06:24:00 2016 GMT
        Subject: CN=christian-folini.ch
        Subject Public Key Info:
            Public Key Algorithm: rsaEncryption
                Public-Key: (4096 bit)
                Modulus:
                    00:ac:e6:34:3a:6d:83:37:31:6e:7a:c5:d1:50:99:
                    93:59:b7:12:d6:28:be:fd:cf:3a:25:f0:d0:0f:9d:
                    c2:d9:8f:77:7b:6c:c8:38:41:26:43:c0:ec:91:46:
                    c9:d4:e7:02:40:e9:90:e0:1f:82:f1:00:53:92:1f:
                    bd:af:47:15:f5:59:03:71:0e:e7:ac:cf:d5:89:f2:
                    fc:b7:8a:84:26:37:f4:0d:16:5e:79:c8:8a:87:ec:
                    8c:c0:de:cb:1e:23:36:68:6a:c0:9c:51:04:77:cc:
                    21:01:47:02:3c:d4:6b:fe:c7:b4:d7:b0:05:04:ad:
                    42:e8:fd:41:2d:28:69:85:ba:eb:f2:f9:73:a6:5b:
                    50:1e:a7:df:ec:ae:ab:69:fd:99:f3:90:f0:2b:89:
                    1c:0d:9b:08:5b:ab:5a:6d:70:aa:9e:9c:72:bd:32:
                    dc:8a:91:b1:78:b8:c1:87:2a:7c:53:64:d7:69:00:
                    5b:06:07:14:21:80:13:9e:f3:9c:fd:c9:41:93:60:
                    6f:5a:55:4f:66:f5:50:e7:a9:dc:e2:51:5e:19:5a:
                    a3:5d:a3:58:b1:cb:96:b8:62:80:f1:73:cd:32:9c:
                    fd:b2:3c:44:05:a2:d1:0f:78:0b:2a:2e:43:15:21:
                    2f:81:b0:30:73:8d:ba:fb:e5:ce:0e:49:f5:08:62:
                    dd:af:bb:bb:6a:57:04:e6:43:53:b8:d0:ba:c5:bf:
                    6a:0a:17:12:7e:23:a3:bf:c3:a3:ff:50:ad:fc:54:
                    75:84:f6:e0:0c:5e:75:83:aa:cd:ba:ce:e2:43:cf:
                    e6:65:92:55:b7:3e:02:72:6d:0b:5d:45:18:ae:09:
                    a1:ab:b8:b8:24:d1:ae:74:43:dc:e5:4f:0a:37:b9:
                    05:8e:37:b0:67:01:5e:50:b4:7c:89:52:90:d2:fa:
                    59:c0:33:31:f3:f0:35:80:38:a1:1b:fb:7f:c9:d2:
                    5e:40:75:0f:33:73:1e:eb:dc:e3:9a:d1:dc:d6:94:
                    a9:55:2a:f0:71:20:5e:64:71:b0:cf:03:3e:45:76:
                    a6:ff:f1:12:93:5d:0c:d1:2b:5f:fd:1d:6e:ef:71:
                    69:74:f1:dc:a8:64:c0:6b:a8:14:fc:7b:77:4d:d2:
                    42:41:15:fc:10:84:9f:9b:78:bb:64:b1:6c:22:e4:
                    c1:7d:6b:25:95:2a:91:70:16:4a:87:82:38:cd:7f:
                    0a:03:ce:f0:68:c7:29:e5:63:f0:8a:ea:37:2f:ad:
                    fd:ee:89:89:47:12:59:e8:95:c1:48:49:95:96:39:
                    e8:a0:c5:7e:6f:83:6b:bb:fd:8a:00:74:91:54:a4:
                    f9:89:2c:b9:5b:80:d5:d3:52:5e:41:c4:aa:c5:a5:
                    f6:bb:e5
                Exponent: 65537 (0x10001)
        X509v3 extensions:
            X509v3 Key Usage: critical
                Digital Signature, Key Encipherment
            X509v3 Extended Key Usage:
                TLS Web Server Authentication, TLS Web Client Authentication
            X509v3 Basic Constraints: critical
                CA:FALSE
            X509v3 Subject Key Identifier:
                18:46:FD:E3:B3:4C:25:57:46:4A:38:DA:23:78:94:34:23:32:F3:39
            X509v3 Authority Key Identifier:
                keyid:A8:4A:6A:63:04:7D:DD:BA:E6:D1:39:B7:A6:45:65:EF:F3:A8:EC:A1

            Authority Information Access:
                OCSP - URI:http://ocsp.int-x3.letsencrypt.org/
                CA Issuers - URI:http://cert.int-x3.letsencrypt.org/

            X509v3 Subject Alternative Name:
                DNS:christian-folini.ch, DNS:www.christian-folini.ch
            X509v3 Certificate Policies:
                Policy: 2.23.140.1.2.1
                Policy: 1.3.6.1.4.1.44947.1.1.1
                  CPS: http://cps.letsencrypt.org
                  User Notice:
                    Explicit Text: This Certificate may only be relied upon by …
                    Relying Parties and only in accordance with the Certificate …
                    Policy found at https://letsencrypt.org/repository/

    Signature Algorithm: sha256WithRSAEncryption
         53:12:78:10:52:13:29:ae:6c:a2:2d:94:1b:34:5a:07:25:0f:
         e0:0e:e7:cd:bb:b6:ea:14:ef:93:76:ad:19:92:aa:9f:9a:b0:
         cf:a1:b9:2f:96:80:af:1d:5f:df:2a:2b:52:fd:05:be:23:21:
         ab:0d:a0:15:c1:62:50:8d:fa:d8:56:f5:af:73:d6:90:72:6c:
         7e:05:1b:db:a6:6f:d6:b7:cb:f0:89:bd:03:73:b2:ce:a4:2a:
         5b:ab:27:6e:16:be:79:9f:b5:74:74:7e:75:d8:b5:e0:d0:0c:
         69:0a:f1:cf:09:b2:84:be:cd:72:1a:cb:45:97:25:e2:be:1d:
         ff:d2:40:8b:bf:d6:29:95:cf:a6:3d:b8:10:d1:eb:33:38:d4:
         35:39:28:27:a8:c1:f8:c2:1e:e5:52:c9:b2:c6:4a:a1:1d:98:
         ea:94:06:2f:af:5e:8e:0b:a3:05:3a:f2:e9:92:e8:63:9a:b8:
         33:3b:86:b9:60:52:a0:90:40:30:80:b8:fa:4a:15:22:cb:34:
         bf:91:5e:9b:51:7e:8b:a7:6d:4c:59:1e:2c:a4:70:d4:cd:9b:
         ae:6b:57:ce:9e:fb:43:8c:ef:c6:a7:f4:be:39:fd:34:61:4c:
         84:21:e0:fb:74:4d:31:bd:45:c3:1a:58:97:c7:bb:15:be:2a:
         74:c0:7a:dd
-----BEGIN CERTIFICATE-----
MIIGIzCCBQugAwIBAgISA0KXRlh93ThuHbL6dhxXULUiMA0GCSqGSIb3DQEBCwUA
MEoxCzAJBgNVBAYTAlVTMRYwFAYDVQQKEw1MZXQncyBFbmNyeXB0MSMwIQYDVQQD
ExpMZXQncyBFbmNyeXB0IEF1dGhvcml0eSBYMzAeFw0xNjEwMDIwNjI0MDBaFw0x
NjEyMzEwNjI0MDBaMB4xHDAaBgNVBAMTE2NocmlzdGlhbi1mb2xpbmkuY2gwggIi
MA0GCSqGSIb3DQEBAQUAA4ICDwAwggIKAoICAQCs5jQ6bYM3MW56xdFQmZNZtxLW
KL79zzol8NAPncLZj3d7bMg4QSZDwOyRRsnU5wJA6ZDgH4LxAFOSH72vRxX1WQNx
Duesz9WJ8vy3ioQmN/QNFl55yIqH7IzA3sseIzZoasCcUQR3zCEBRwI81Gv+x7TX
sAUErULo/UEtKGmFuuvy+XOmW1Aep9/srqtp/ZnzkPAriRwNmwhbq1ptcKqenHK9
MtyKkbF4uMGHKnxTZNdpAFsGBxQhgBOe85z9yUGTYG9aVU9m9VDnqdziUV4ZWqNd
o1ixy5a4YoDxc80ynP2yPEQFotEPeAsqLkMVIS+BsDBzjbr75c4OSfUIYt2vu7tq
VwTmQ1O40LrFv2oKFxJ+I6O/w6P/UK38VHWE9uAMXnWDqs26zuJDz+ZlklW3PgJy
bQtdRRiuCaGruLgk0a50Q9zlTwo3uQWON7BnAV5QtHyJUpDS+lnAMzHz8DWAOKEb
+3/J0l5AdQ8zcx7r3OOa0dzWlKlVKvBxIF5kcbDPAz5Fdqb/8RKTXQzRK1/9HW7v
cWl08dyoZMBrqBT8e3dN0kJBFfwQhJ+beLtksWwi5MF9ayWVKpFwFkqHgjjNfwoD
zvBoxynlY/CK6jcvrf3uiYlHElnolcFISZWWOeigxX5vg2u7/YoAdJFUpPmJLLlb
gNXTUl5BxKrFpfa75QIDAQABo4ICLTCCAikwDgYDVR0PAQH/BAQDAgWgMB0GA1Ud
JQQWMBQGCCsGAQUFBwMBBggrBgEFBQcDAjAMBgNVHRMBAf8EAjAAMB0GA1UdDgQW
BBQYRv3js0wlV0ZKONojeJQ0IzLzOTAfBgNVHSMEGDAWgBSoSmpjBH3duubRObem
RWXv86jsoTBwBggrBgEFBQcBAQRkMGIwLwYIKwYBBQUHMAGGI2h0dHA6Ly9vY3Nw
LmludC14My5sZXRzZW5jcnlwdC5vcmcvMC8GCCsGAQUFBzAChiNodHRwOi8vY2Vy
dC5pbnQteDMubGV0c2VuY3J5cHQub3JnLzA3BgNVHREEMDAughNjaHJpc3RpYW4t
Zm9saW5pLmNoghd3d3cuY2hyaXN0aWFuLWZvbGluaS5jaDCB/gYDVR0gBIH2MIHz
MAgGBmeBDAECATCB5gYLKwYBBAGC3xMBAQEwgdYwJgYIKwYBBQUHAgEWGmh0dHA6
Ly9jcHMubGV0c2VuY3J5cHQub3JnMIGrBggrBgEFBQcCAjCBngyBm1RoaXMgQ2Vy
dGlmaWNhdGUgbWF5IG9ubHkgYmUgcmVsaWVkIHVwb24gYnkgUmVseWluZyBQYXJ0
aWVzIGFuZCBvbmx5IGluIGFjY29yZGFuY2Ugd2l0aCB0aGUgQ2VydGlmaWNhdGUg
UG9saWN5IGZvdW5kIGF0IGh0dHBzOi8vbGV0c2VuY3J5cHQub3JnL3JlcG9zaXRv
cnkvMA0GCSqGSIb3DQEBCwUAA4IBAQBTEngQUhMprmyiLZQbNFoHJQ/gDufNu7bq
FO+Tdq0ZkqqfmrDPobkvloCvHV/fKitS/QW+IyGrDaAVwWJQjfrYVvWvc9aQcmx+
BRvbpm/Wt8vwib0Dc7LOpCpbqyduFr55n7V0dH512LXg0AxpCvHPCbKEvs1yGstF
lyXivh3/0kCLv9Yplc+mPbgQ0eszONQ1OSgnqMH4wh7lUsmyxkqhHZjqlAYvr16O
C6MFOvLpkuhjmrgzO4a5YFKgkEAwgLj6ShUiyzS/kV6bUX6Lp21MWR4spHDUzZuu
a1fOnvtDjO/Gp/S+Of00YUyEIeD7dE0xvUXDGliXx7sVvip0wHrd
-----END CERTIFICATE-----
If the certificate meets our expectations, we will copy it together with the key to the right location on the server. We will do this by hand first. Outside of the certificate and the key we also have to transfer the chain file. What’s that, you may wonder. As we have seen, the browser trusts a series of certificate authorities from the start. When performing an SSL-handshake, this trust is being extended to the webserver. To perform this, the browser will try and build a chain of trust to one of the certificate authorities known to it. After the server certificate, the chains runs via the intermediate certificates we deliver in the form of the chain file. This means, that the root certificate known to the browser has signed the first element of the chain file. This certificate has been used to sign the next certificate and so forth down to the server certificate, we recently obtained. If the signatures are all valid, then the chain is intact and the browser assumes, it is speaking to the correct server. This means the chain file has an important role as a link between the certificate authority and our server. That’s why getssl has downloaded the file for us and stored it under ~/.getssl/christian-folini.ch/chain.crt, as reported to us above. So, let’s take these three files and let’s copy them onto the server. The exact position is not that important. That’s why I decide to use a location with the already well protected keys and certificates of the system under /etc/ssl.
$> sudo cp ~/.getssl/christian-folini.ch/christian-folini.ch.key /etc/ssl/private/
$> sudo cp ~/.getssl/christian-folini.ch/christian-folini.ch.crt /etc/ssl/certs/
$> sudo cp ~/.getssl/christian-folini.ch/chain.crt /etc/ssl/certs/lets-encrypt-chain.crt
It is important to get the permission right (and to make sure ~/.getssl/christian-folini.ch/christian-folini.ch.key is not accessible either). Only the key has to remain really secret from everybody outside of root. It is only being used when starting the server. The certificate files are less delicate and in fact we will also hand them out to the clients when they perform their requests.
$> sudo chmod 400 /etc/ssl/private/christian-folini.key
$> sudo chown root:root /etc/ssl/private/christian-folini.key
$> sudo chmod 644 /etc/ssl/certs/christian-folini.crt
$> sudo chown root:root /etc/ssl/certs/christian-folini.crt
$> sudo chmod 644 /etc/ssl/certs/lets-encrypt-chain.crt
$> sudo chown root:root /etc/ssl/certs/lets-encrypt-chain.crt
Then we enter the new paths into the configuration:
SSLCertificateKeyFile   /etc/ssl/private/christian-folini.ch.key
SSLCertificateFile      /etc/ssl/certs/christian-folini.ch.crt
SSLCertificateChainFile /etc/ssl/certs/lets-encrypt-chain.crt
Step 5: Examining the chain of trust
Before we can start using the browser or curl to call our server, it is a good practice to check the chain of trust and to make sure the encryption is properly configured. Let’s start the server and check it out. We will use the command line tool openssl again. It really shines with all the options it has. However, OpenSSL does not have a list of known and trusted certificate authorities. We have to tell the tool about the Let’s Encrypt certificate authority and its root certificate respectively. We will fetch it from Let’s Encrypt and we will then call openssl with the root CA as a parameter:
$> wget https://letsencrypt.org/certs/isrgrootx1.pem -O /tmp/ca-lets-encrypt.crt
...
$> openssl s_client -showcerts -CAfile /tmp/ca-lets-encrypt.crt \
-connect 127.0.0.1:443 -servername www.christian-folini.ch
This instructs openssl to use it’s internal HTTP client, to show us the full certificate information, to use the CA file we just downloaded, to connect to our localhost server and to use www.christian-folini.ch as the name for the server. If all went smoothly, we will see an output similar to the following:
depth=2 O = Digital Signature Trust Co., CN = DST Root CA X3
verify return:1
depth=1 C = US, O = Let's Encrypt, CN = Let's Encrypt Authority X3
verify return:1
depth=0 CN = christian-folini.ch
verify return:1
CONNECTED(00000003)
---
Certificate chain
 0 s:/CN=christian-folini.ch
   i:/C=US/O=Let's Encrypt/CN=Let's Encrypt Authority X3
-----BEGIN CERTIFICATE-----
MIIGIzCCBQugAwIBAgISA0KXRlh93ThuHbL6dhxXULUiMA0GCSqGSIb3DQEBCwUA
MEoxCzAJBgNVBAYTAlVTMRYwFAYDVQQKEw1MZXQncyBFbmNyeXB0MSMwIQYDVQQD
ExpMZXQncyBFbmNyeXB0IEF1dGhvcml0eSBYMzAeFw0xNjEwMDIwNjI0MDBaFw0x
NjEyMzEwNjI0MDBaMB4xHDAaBgNVBAMTE2NocmlzdGlhbi1mb2xpbmkuY2gwggIi
MA0GCSqGSIb3DQEBAQUAA4ICDwAwggIKAoICAQCs5jQ6bYM3MW56xdFQmZNZtxLW
KL79zzol8NAPncLZj3d7bMg4QSZDwOyRRsnU5wJA6ZDgH4LxAFOSH72vRxX1WQNx
Duesz9WJ8vy3ioQmN/QNFl55yIqH7IzA3sseIzZoasCcUQR3zCEBRwI81Gv+x7TX
sAUErULo/UEtKGmFuuvy+XOmW1Aep9/srqtp/ZnzkPAriRwNmwhbq1ptcKqenHK9
MtyKkbF4uMGHKnxTZNdpAFsGBxQhgBOe85z9yUGTYG9aVU9m9VDnqdziUV4ZWqNd
o1ixy5a4YoDxc80ynP2yPEQFotEPeAsqLkMVIS+BsDBzjbr75c4OSfUIYt2vu7tq
VwTmQ1O40LrFv2oKFxJ+I6O/w6P/UK38VHWE9uAMXnWDqs26zuJDz+ZlklW3PgJy
bQtdRRiuCaGruLgk0a50Q9zlTwo3uQWON7BnAV5QtHyJUpDS+lnAMzHz8DWAOKEb
+3/J0l5AdQ8zcx7r3OOa0dzWlKlVKvBxIF5kcbDPAz5Fdqb/8RKTXQzRK1/9HW7v
cWl08dyoZMBrqBT8e3dN0kJBFfwQhJ+beLtksWwi5MF9ayWVKpFwFkqHgjjNfwoD
zvBoxynlY/CK6jcvrf3uiYlHElnolcFISZWWOeigxX5vg2u7/YoAdJFUpPmJLLlb
gNXTUl5BxKrFpfa75QIDAQABo4ICLTCCAikwDgYDVR0PAQH/BAQDAgWgMB0GA1Ud
JQQWMBQGCCsGAQUFBwMBBggrBgEFBQcDAjAMBgNVHRMBAf8EAjAAMB0GA1UdDgQW
BBQYRv3js0wlV0ZKONojeJQ0IzLzOTAfBgNVHSMEGDAWgBSoSmpjBH3duubRObem
RWXv86jsoTBwBggrBgEFBQcBAQRkMGIwLwYIKwYBBQUHMAGGI2h0dHA6Ly9vY3Nw
LmludC14My5sZXRzZW5jcnlwdC5vcmcvMC8GCCsGAQUFBzAChiNodHRwOi8vY2Vy
dC5pbnQteDMubGV0c2VuY3J5cHQub3JnLzA3BgNVHREEMDAughNjaHJpc3RpYW4t
Zm9saW5pLmNoghd3d3cuY2hyaXN0aWFuLWZvbGluaS5jaDCB/gYDVR0gBIH2MIHz
MAgGBmeBDAECATCB5gYLKwYBBAGC3xMBAQEwgdYwJgYIKwYBBQUHAgEWGmh0dHA6
Ly9jcHMubGV0c2VuY3J5cHQub3JnMIGrBggrBgEFBQcCAjCBngyBm1RoaXMgQ2Vy
dGlmaWNhdGUgbWF5IG9ubHkgYmUgcmVsaWVkIHVwb24gYnkgUmVseWluZyBQYXJ0
aWVzIGFuZCBvbmx5IGluIGFjY29yZGFuY2Ugd2l0aCB0aGUgQ2VydGlmaWNhdGUg
UG9saWN5IGZvdW5kIGF0IGh0dHBzOi8vbGV0c2VuY3J5cHQub3JnL3JlcG9zaXRv
cnkvMA0GCSqGSIb3DQEBCwUAA4IBAQBTEngQUhMprmyiLZQbNFoHJQ/gDufNu7bq
FO+Tdq0ZkqqfmrDPobkvloCvHV/fKitS/QW+IyGrDaAVwWJQjfrYVvWvc9aQcmx+
BRvbpm/Wt8vwib0Dc7LOpCpbqyduFr55n7V0dH512LXg0AxpCvHPCbKEvs1yGstF
lyXivh3/0kCLv9Yplc+mPbgQ0eszONQ1OSgnqMH4wh7lUsmyxkqhHZjqlAYvr16O
C6MFOvLpkuhjmrgzO4a5YFKgkEAwgLj6ShUiyzS/kV6bUX6Lp21MWR4spHDUzZuu
a1fOnvtDjO/Gp/S+Of00YUyEIeD7dE0xvUXDGliXx7sVvip0wHrd
-----END CERTIFICATE-----
 1 s:/C=US/O=Let's Encrypt/CN=Let's Encrypt Authority X3
   i:/O=Digital Signature Trust Co./CN=DST Root CA X3
-----BEGIN CERTIFICATE-----
MIIEkjCCA3qgAwIBAgIQCgFBQgAAAVOFc2oLheynCDANBgkqhkiG9w0BAQsFADA/
MSQwIgYDVQQKExtEaWdpdGFsIFNpZ25hdHVyZSBUcnVzdCBDby4xFzAVBgNVBAMT
DkRTVCBSb290IENBIFgzMB4XDTE2MDMxNzE2NDA0NloXDTIxMDMxNzE2NDA0Nlow
SjELMAkGA1UEBhMCVVMxFjAUBgNVBAoTDUxldCdzIEVuY3J5cHQxIzAhBgNVBAMT
GkxldCdzIEVuY3J5cHQgQXV0aG9yaXR5IFgzMIIBIjANBgkqhkiG9w0BAQEFAAOC
AQ8AMIIBCgKCAQEAnNMM8FrlLke3cl03g7NoYzDq1zUmGSXhvb418XCSL7e4S0EF
q6meNQhY7LEqxGiHC6PjdeTm86dicbp5gWAf15Gan/PQeGdxyGkOlZHP/uaZ6WA8
SMx+yk13EiSdRxta67nsHjcAHJyse6cF6s5K671B5TaYucv9bTyWaN8jKkKQDIZ0
Z8h/pZq4UmEUEz9l6YKHy9v6Dlb2honzhT+Xhq+w3Brvaw2VFn3EK6BlspkENnWA
a6xK8xuQSXgvopZPKiAlKQTGdMDQMc2PMTiVFrqoM7hD8bEfwzB/onkxEz0tNvjj
/PIzark5McWvxI0NHWQWM6r6hCm21AvA2H3DkwIDAQABo4IBfTCCAXkwEgYDVR0T
AQH/BAgwBgEB/wIBADAOBgNVHQ8BAf8EBAMCAYYwfwYIKwYBBQUHAQEEczBxMDIG
CCsGAQUFBzABhiZodHRwOi8vaXNyZy50cnVzdGlkLm9jc3AuaWRlbnRydXN0LmNv
bTA7BggrBgEFBQcwAoYvaHR0cDovL2FwcHMuaWRlbnRydXN0LmNvbS9yb290cy9k
c3Ryb290Y2F4My5wN2MwHwYDVR0jBBgwFoAUxKexpHsscfrb4UuQdf/EFWCFiRAw
VAYDVR0gBE0wSzAIBgZngQwBAgEwPwYLKwYBBAGC3xMBAQEwMDAuBggrBgEFBQcC
ARYiaHR0cDovL2Nwcy5yb290LXgxLmxldHNlbmNyeXB0Lm9yZzA8BgNVHR8ENTAz
MDGgL6AthitodHRwOi8vY3JsLmlkZW50cnVzdC5jb20vRFNUUk9PVENBWDNDUkwu
Y3JsMB0GA1UdDgQWBBSoSmpjBH3duubRObemRWXv86jsoTANBgkqhkiG9w0BAQsF
AAOCAQEA3TPXEfNjWDjdGBX7CVW+dla5cEilaUcne8IkCJLxWh9KEik3JHRRHGJo
uM2VcGfl96S8TihRzZvoroed6ti6WqEBmtzw3Wodatg+VyOeph4EYpr/1wXKtx8/
wApIvJSwtmVi4MFU5aMqrSDE6ea73Mj2tcMyo5jMd6jmeWUHK8so/joWUoHOUgwu
X4Po1QYz+3dszkDqMp4fklxBwXRsW10KXzPMTZ+sOPAveyxindmjkW8lGy+QsRlG
PfZ+G6Z6h7mjem0Y+iWlkYcV4PIWL1iwBi8saCbGS5jN2p8M+X+Q7UNKEkROb3N6
KOqkqm57TH2H3eDJAkSnh6/DNFu0Qg==
-----END CERTIFICATE-----
---
Server certificate
subject=/CN=christian-folini.ch
issuer=/C=US/O=Let's Encrypt/CN=Let's Encrypt Authority X3
---
No client certificate CA names sent
---
SSL handshake has read 3719 bytes and written 453 bytes
---
New, TLSv1/SSLv3, Cipher is ECDHE-RSA-AES256-GCM-SHA384
Server public key is 4096 bit
Secure Renegotiation IS supported
Compression: NONE
Expansion: NONE
SSL-Session:
    Protocol  : TLSv1.2
    Cipher    : ECDHE-RSA-AES256-GCM-SHA384
    Session-ID: 14085DAC8BEEEE156D6B12EA9010A765D3237501B2C8142BDDEDE7DAF6D1C708
    Session-ID-ctx:
    Master-Key: 96C3DCF06D88B17C3FCDEDA226AC05015CE0EFFFCBEB57175A7742D6EF59500C3 …
    Key-Arg   : None
    PSK identity: None
    PSK identity hint: None
    SRP username: None
    TLS session ticket lifetime hint: 300 (seconds)
    TLS session ticket:
    0000 - 24 ae 3e f6 19 3e b5 b5-5c 91 8f f3 04 87 38 6a   $.>..>..\.....8j
    0010 - 35 69 84 d5 3b a8 29 1a-95 df 2a a1 29 ce 82 eb   5i..;.)...*.)...
    0020 - bd f1 52 83 44 1f a3 8a-46 62 97 09 c5 4f 42 3b   ..R.D...Fb...OB;
    0030 - 1c 62 d6 4b 69 88 5f 83-e5 75 c1 cf 63 24 6f cd   .b.Ki._..u..c$o.
    0040 - 76 03 6e c6 f8 29 48 d8-dc fc ad aa 9b 3d 17 7f   v.n..)H......=..
    0050 - 0d c4 06 ea 38 7e 7e f4-b4 24 a0 f2 b3 9b ea a9   ....8~~..$......
    0060 - 8d 8b 0a 69 18 14 d4 ff-47 f0 b9 c7 a2 54 11 e0   ...i....G....T..
    0070 - 42 cf f3 42 21 34 7e f9-05 05 f7 34 7c d8 a3 9d   B..B!4~....4|...
    0080 - c5 1a d1 99 70 de d3 c4-19 4e ef 51 42 df 70 3d   ....p....N.QB.p=
    0090 - 11 82 b6 77 94 ae 7b a6-a0 c9 b5 e1 41 0a 89 4f   ...w..{.....A..O
    00a0 - 0c 99 11 db 0a 79 42 20-30 02 2c e5 13 f0 76 ce   .....yB 0.,...v.
    00b0 - fa bc 57 5c 92 2d be b0-a2 9e 45 09 a8 d9 4e 67   ..W\.-....E...Ng
    00c0 - b7 9e d4 d3 d7 49 05 79-37 1e d3 19 1f 6d 49 ff   .....I.y7....mI.

    Start Time: 1475506220
    Timeout   : 300 (sec)
    Verify return code: 0 (ok)
---
The first few lines are very important as they list the chain. Of equal importance is the last line with the ok. This proves that the chain has been checked successfully and that a secure communication channel with the server has been built.
If we examine the chain on top carefully, we will see that Let’s Encrypt is depending on an additional certificate authority. This is necessary as Let’s Encrypt is a very young certificate authority and it has not yet found its way into all browsers. This forces Let’s Encrypt to have it’s certificate signed by a different certificate authority known to the browser.
Step 6: Enhancing the Apache configuration a bit
All of the preparations are now completed and we can do the final configuration of the web server. I won’t be giving you the complete configuration here, but only the specific server name and the tweaked SSL section:
ServerName              www.christian-folini.ch

...

LoadModule              socache_shmcb_module    modules/mod_socache_shmcb.so

...

SSLCertificateKeyFile   /etc/ssl/private/christian-folini.ch.key
SSLCertificateFile      /etc/ssl/certs/christian-folini.ch.crt
SSLCertificateChainFile /etc/ssl/certs/lets-encrypt-chain.crt

SSLProtocol             All -SSLv2 -SSLv3
SSLCipherSuite          'kEECDH+ECDSA kEECDH kEDH HIGH +SHA !aNULL !eNULL !LOW !MEDIUM \
!MD5 !EXP !DSS !PSK !SRP !kECDH !CAMELLIA !RC4'
SSLHonorCipherOrder     On

SSLRandomSeed           startup file:/dev/urandom 2048
SSLRandomSeed           connect builtin

SSLSessionCache         "shmcb:/apache/logs/ssl_gcache_data(1024000)"
SSLSessionTickets       On


...


<VirtualHost 127.0.0.1:443>

        ServerName              www.christian-folini.ch

        SSLEngine On
        Header always set Strict-Transport-Security "max-age=31536000; includeSubDomains" env=HTTPS

        ...
It’s also useful to enter the ServerName matching the certificate in the VirtualHost. If we don’t do that, Apache will put up a warning (and then still select the only configured virtual host and continue to work correctly).
The SSLSessionCache and SSLSessionTickets options are new. These two directives control the behavior of the SSL session cache. The cache requires the socache_shmcb module, which provides caching functionality and is addressed using mod_ssl. There are alternative cache provider modules, but this is straight forward. It works as follows: During the SSL handshake the parameters of the connection such as the key and an encryption algorithm are negotiated. This takes place in public key mode, which is very CPU intense. Once the handshake is successfully completed, the server communicates with the client via higher performance symmetric encryption using the parameters that were just negotiated. Once the request has been completed and the keep-alive period in the new request has been exceeded, the TCP connection and the parameters imposed along with the connection are lost. If the connection is reopened just a short time later, the parameters will have to be negotiated again. This is time-consuming, as we have just seen. It would be better if the parameters that were previously negotiated could be reactivated and also used by different processing threads. This option exists in the form of the SSL session cache. This cache has traditionally been managed on the server side.
For a session cache via tickets, the parameters are combined in a session ticket and sent to the client, where they are stored on the client side, saving disk space on the web server. When opening a new connection the client sends the parameters to the server and it configures the connection accordingly. To prevent manipulation of the parameters in the ticket, the server temporarily signs the ticket and again verifies it when opening a connection. Something to consider with this mechanism is that the signature depends on a signing key and it is a good idea to regularly update the key that is for the most part dynamically generated. Restarting the server guarantees this.
SSL session tickets are recent and are now supported by all major browsers. They are also considered secure thanks to the signing process. However, this does not change the fact that there is a theoretical vulnerability in which session parameters are stolen on the client side.
Both types of session caches can be disabled. This is done as follows:
SSLSessionCache         nonenotnull
SSLSessionTickets       Off
Of course, this adjustment will have consequences in terms of performance. You will see a small drop of throughput on the server, but the clients will encounter bigger latency, as the SSL/TLS handshake has to be performed anew and from scratch. So it is again a trade off between reducing your attack surface and performance: Most people leave the caching in place and I think this is generally a good practice.
Step 7: Trying it out
Now that we are sure to own an officially signed certificate with a valid chain of trust and now that we understand all the other configuration options in detail, we can turn to the browser and call the domain we configured. In my case, this is https://www.christian-folini.ch.
The browser confirms, this is a secure connection.
Step 8: Fetching the certificate via Cron from Let’s Encrypt
Let’s Encrypt creates the certificates for a period of 90 days per default. This means we will have to perform the manual call as outlined above every three months. This can be automated, though. As the getssl process needs to access the certificate key, the process has to operate as the root user. Additionally, the certificate authority Let’s Encrypt has to be called via the internet. As a matter of fact, this means that we have to tell root to access the internet. This is not without risks and has to be considered carefully.
The script getssl offers a feature, to make this call from a different host than the webserver; typically an administration host. This will only work if the certificate key is being stored on multiple servers. That’s another risk.
It is important to weigh the various risks and to come to a conclusion for the specific case. If you have defined a good solution, then you can automate the process by performing the following edits in the configuration of getssl:
- Alter the
aclentries if you have chosen to work from an administration server. - Define the variable
DOMAIN_CERT_LOCATION - Define the variable
DOMAIN_KEY_LOCATION - Define the variable
DOMAIN_CHAIN_LOCATION - Define the variable
RELOAD_CMD - Create the cron job
The following entry in the crontab calls getssl daily. The script will then decide if the renewal is due. The path to getssl might have to be adapted, depending on the location of the script and the config files (the --no-check option will tell the script it should not contact github to look for a new version of itself):
30 4 * * * getssl --all --quiet --nocheckWith this, the signing and renewal of the certificate is fully automated and we are done.
Interestingly, there is something like a checking instance in the internet, where you can have your HTTPS-server examined. Let’s try this out as a goodie.
Step 9 (Goodie): Checking the quality of SSL externally
Ivan Ristić, mentioned above as the author of several books on Apache and SSL, launched an analysis service that checks SSL web servers. He has sold the site to Qualys in the meantime, but it is still being maintained and actively expanded. It is available at www.ssllabs.com. A web server configured like the one above earned me the highest grade of A+ on the test.
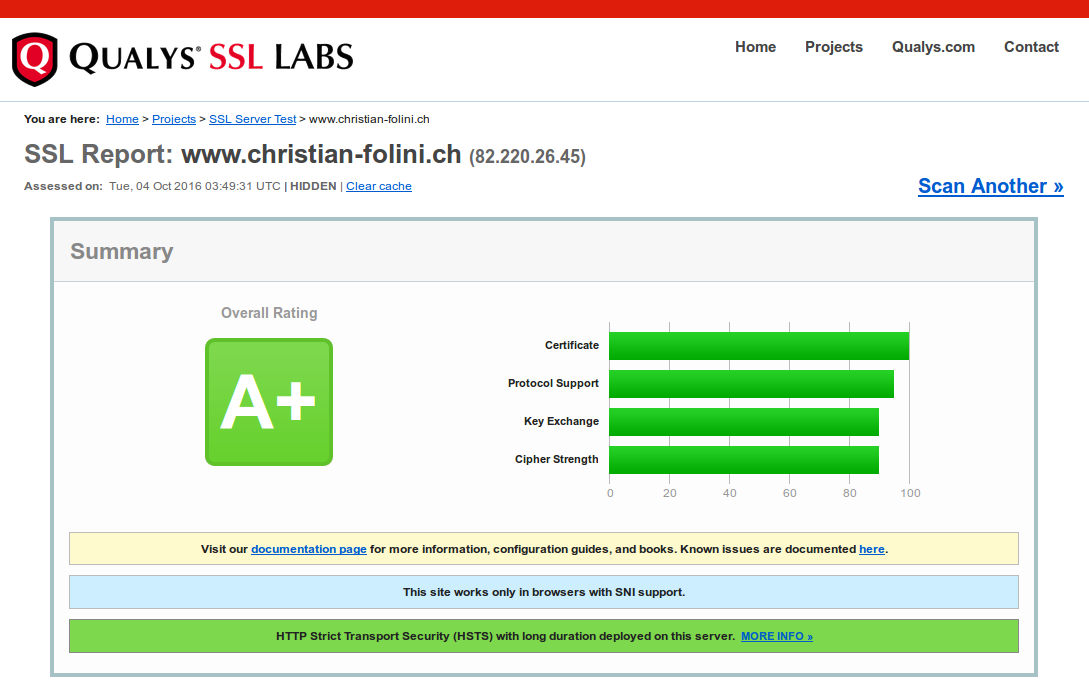
The highest grade is attainable by following these instructions.
References
- Wikipedia OpenSSL
- OpenSSL Cookbook
- Bulletproof SSL and TLS
- Apache Mod_SSL
- Let’s Encrypt
- Let’s Encrypt: How it works
- SSLLabs
- Keylength.com – background information about ciphers and keys
License / Copying / Further use

This work is licensed under a Creative Commons Attribution-NonCommercial-ShareAlike 4.0 International License.
Changelog
- 2019-11-04: Added env=HTTPS condition to STS header config
- 2019-10-31: Disabling TLSv1 and TLSv1.1
- 2018-04-13: Update title format (markdown); rewordings (Simon Studer)
- 2017-12-17: Fixed several links
- 2017-03-04: Fixed IP address of VirtualHosts to 127.0.0.1, updated stdout of curl calls
- 2017-02-25: Getting rid of AllowOverride completely
- 2017-02-16: Reformatting
- 2017-02-15: Updates to session cache and session tickets description
- 2017-02-14: Updated the description of the Let’s Encrypt mechanics, added new link to ‘How-it-works’
- 2016-12-28: Adjusted Timeout and MaxRequestWorkers, Listener now set to 127.0.0.1, cosmetics
- 2016-12-04: Fix omission of STS header in basic config block
- 2016-10-12: Adjusting text for cipher suite, random source, includeSubDomains and session cache after input by Ivan Ristić
- 2016-10-11: Spelling, English style and spelling
- 2016-10-08: Rewritten for Let’s Encrypt (with support from Luca Käser)
- 2016-03-16: Translated to English